BetterLinks now ships with a built-in MCP server, so you no longer have to open your WordPress dashboard every time you want to shorten, edit or analyze a link.
MCP (Model Context Protocol) is an open standard that allows AI assistants to talk directly to the tools you already use. Once BetterLinks is connected, you can simply ask your assistant to create a branded short link, tidy up your categories or pull last month’s click data, and it will do the work inside your site for you.
Note: Before you start, ensure to install & activate BetterLinks on your WordPress website.
This guide shows you how to enable MCP access in BetterLinks, copy your secure connector URL and connect it to Claude and ChatGPT. The same connector also works with Claude Code, Cursor and VS Code, so your links stay reachable from wherever you work.
The full tool reference is below. Read tools only fetch data; write tools change data on your site and stay behind an approval prompt in your assistant by default:
| Tool | Type | What it does |
|---|---|---|
| list-links | Read | List all short links grouped by category, with slug, target URL, status and click count |
| create-link | Write | Create a new short link (slug, target URL, category, nofollow or sponsored flags) |
| update-link | Write | Update an existing link’s title, target, slug, redirect type, category or status |
| delete-link | Write | Permanently delete a short link and its click data |
| list-categories | Read | List every link category |
| list-tags | Read | List every link tag |
| create-term | Write | Create a new category or tag |
| update-term | Write | Rename a category or tag |
| delete-term | Write | Delete a category or tag |
| get-analytics | Read | Site-wide click totals, unique visitors and per-link summary |
| get-link-analytics | Read | Detailed click data for a single link |
| get-analytics-graph | Read | Time-series graph data for the dashboard chart |
| get-settings | Read | Read current BetterLinks settings |
| update-settings | Write | Update BetterLinks settings (partial merge; unspecified keys are preserved) |
Site requirements (HTTPS) #
Claude (web, mobile, desktop) and ChatGPT require your site to be served over HTTPS. If your site is HTTP-only, the connectors will refuse to sign in and return an opaque error at the approval screen. Claude Code CLI, Cursor and VS Code will work over HTTP for local development, so you can still test the Editors & CLI tab against a Local WP site.
Permalinks #
The pretty connector URL https://yoursite.com/betterlinks/mcp needs a permalink structure other than ‘Plain’ (Settings → Permalinks in WordPress).
If you must stay on Plain permalinks, use the REST fallback URL instead: https://yoursite.com/wp-json/betterlinks/v1/mcp. It exposes the same 14 tools.
Part 1: Set Up MCP Access in BetterLinks #
The MCP screen offers two ways to connect an assistant: the OAuth tab and the Editors & CLI tab. They serve different clients:
- OAuth is best for Claude on web, desktop or mobile and for ChatGPT. Each app gets its own revocable grant, so revoking Claude does not disconnect ChatGPT.
- Editors & CLI (pairing token) is best for Claude Code, Cursor, VS Code and Claude Desktop. All four share a single static token. If it leaks, you cannot revoke a single client; Reset token rotates it for all of them at once.
Pick the tab that matches the assistant you want to connect, then follow the steps for it below.
Step 1: Enable MCP Access #
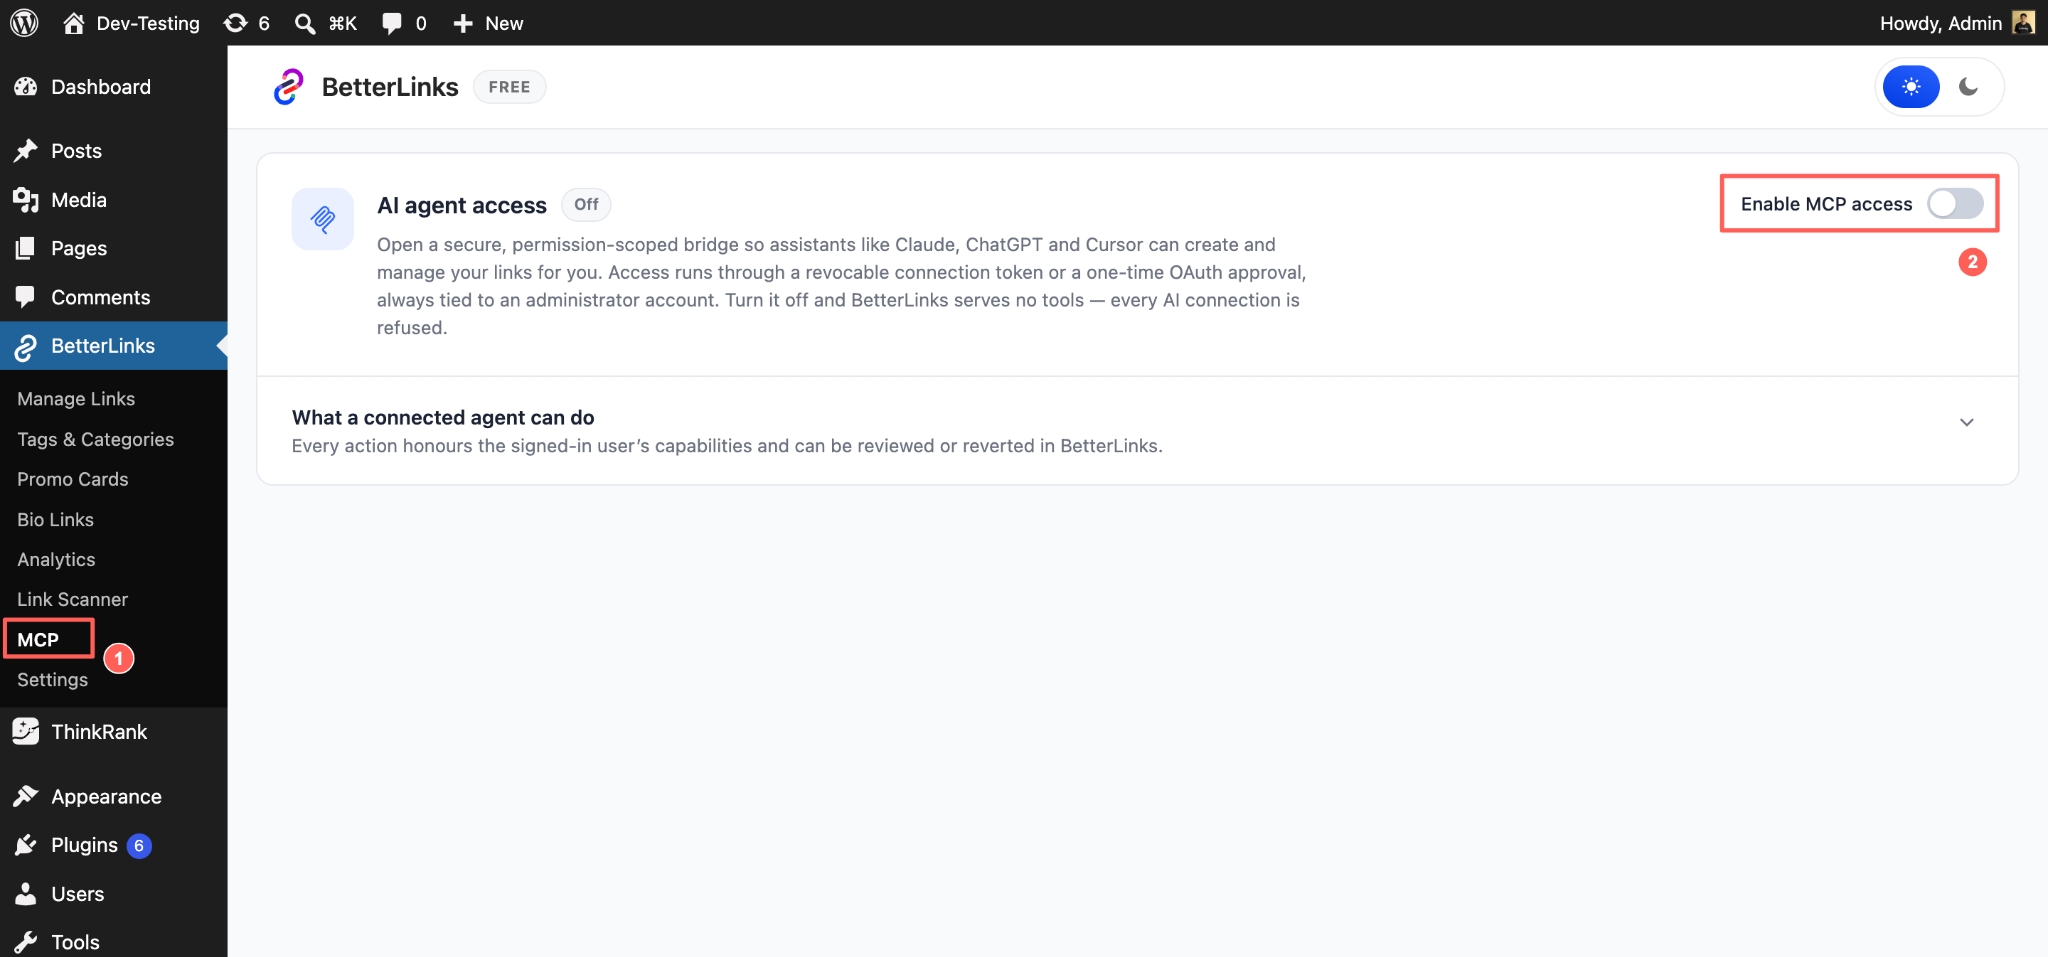
From your WordPress dashboard, navigate to BetterLinks → MCP as marked in the screenshot below. This page is the control center for every AI connection to your site.
By default, the AI agent access status is set to ‘Off‘, which means BetterLinks serves no tools and therefore declines incoming AI requests. Click the ‘Enable MCP access‘ toggle in the top right corner to switch it on. The status badge immediately updates to ‘On’ beside and the connection options appear underneath.
You can also expand the ‘What a connected agent can do‘ panel on the same page to review exactly which capabilities you are about to hand over before you connect anything.
Step 2: Copy Your Connector URL #
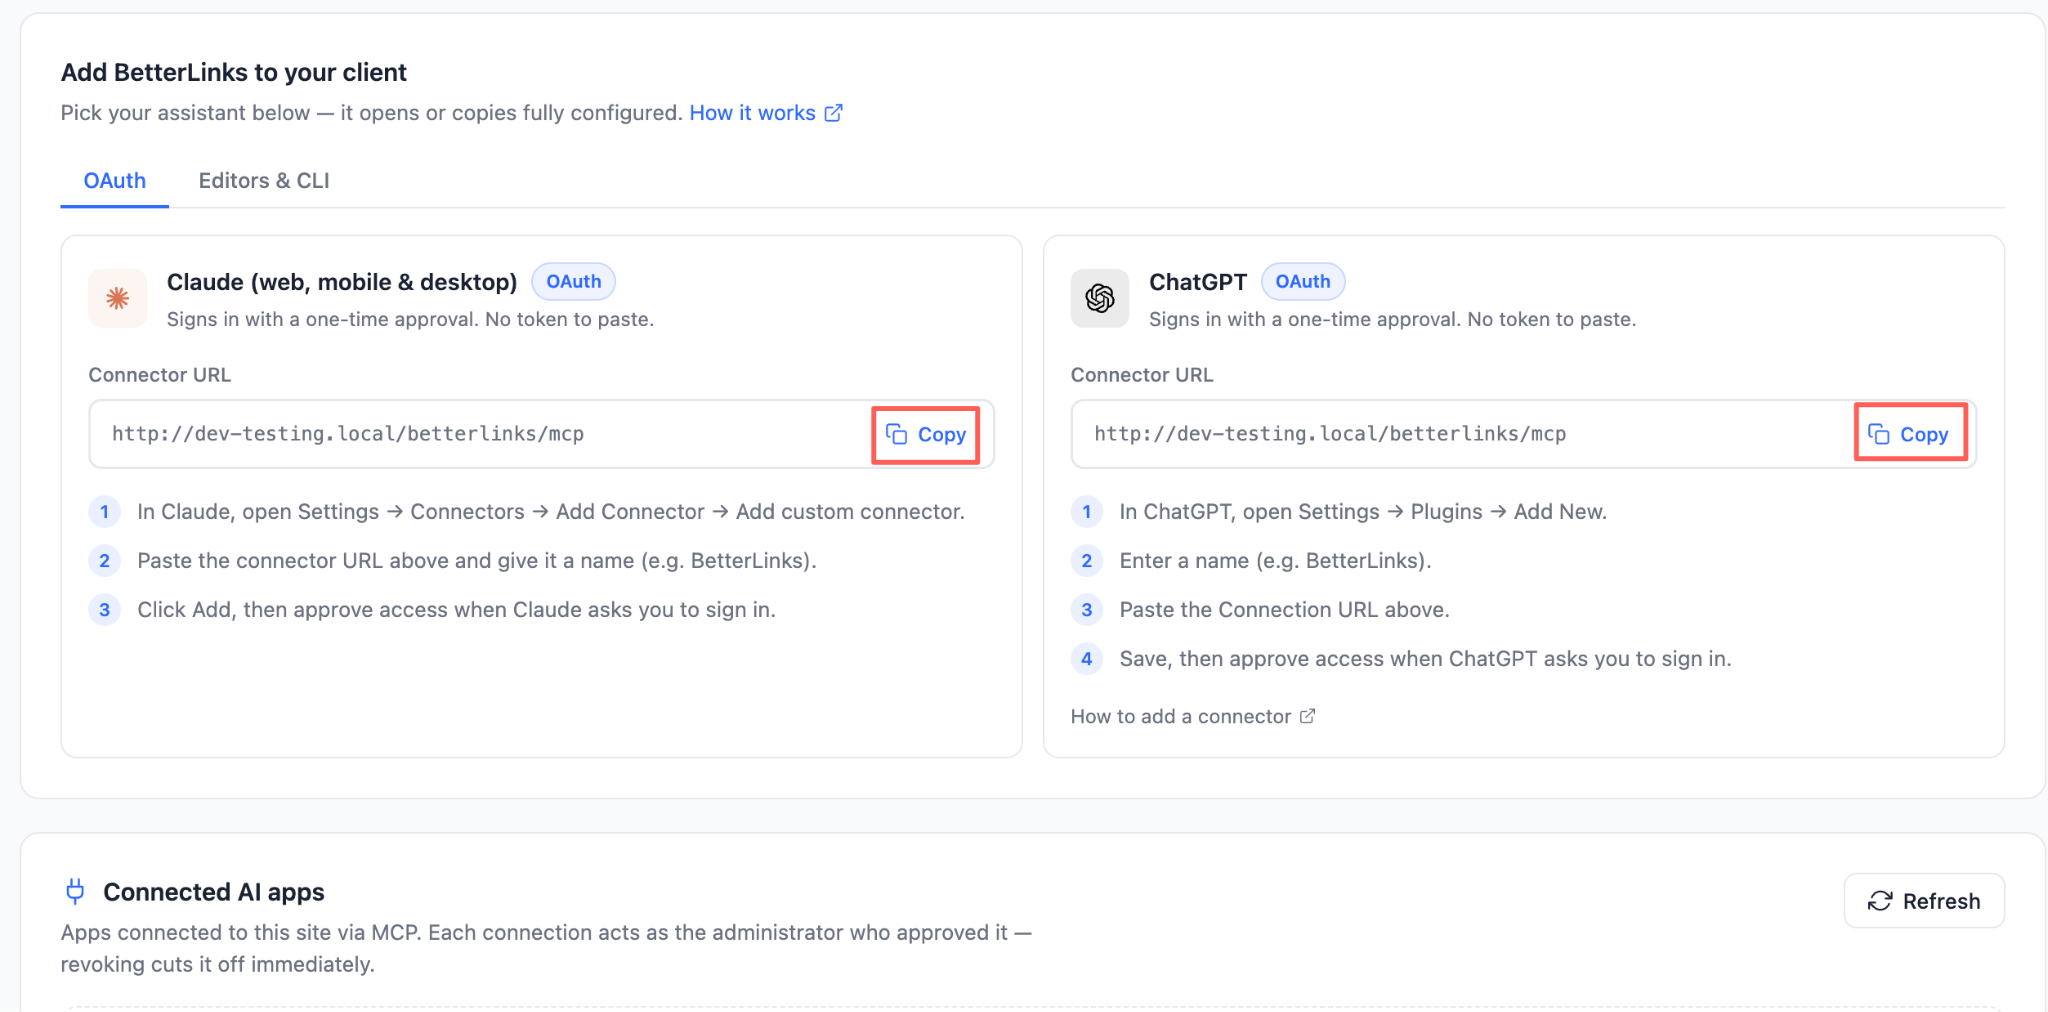
Scroll down to the ‘Add BetterLinks to your client‘ section and stay on the ‘OAuth‘ tab. This tab is for assistants which sign in with a one-time approval, so there is no token to generate or paste anywhere.
You will see a card for ‘Claude‘ and a card for ‘ChatGPT‘, each showing the same connector URL along with a short set of setup instructions. The URL is simply your site address followed by /betterlinks/mcp. Click the ‘Copy‘ button on the card that matches your assistant and keep the URL on your clipboard for the next steps.
Step 3: Connect Editors and CLI Tools (Optional) #
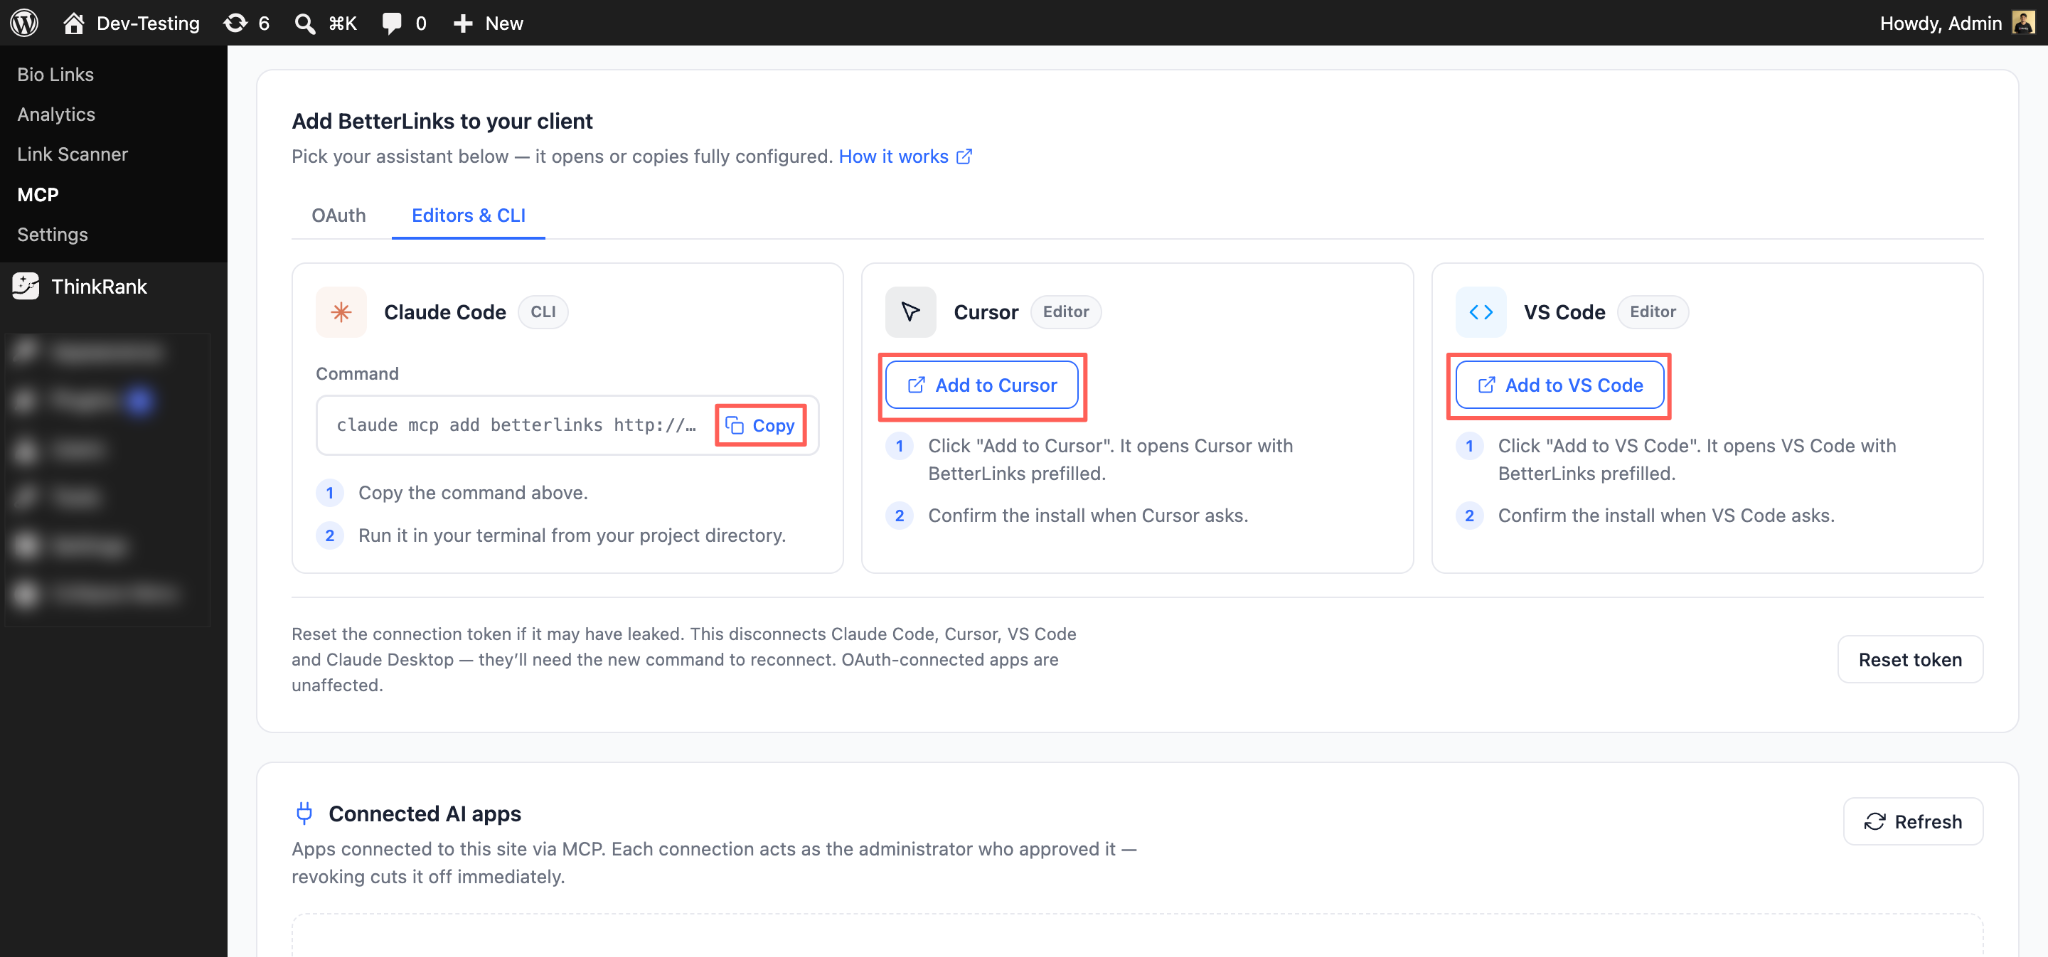
If you would rather work from your code editor or terminal, switch to the ‘Editors & CLI‘ tab. BetterLinks prepares a ready-to-run setup for each supported tool so you do not have to write any configuration by hand.
- Claude Code: copy the prefilled Claude MCP add betterlinks command and run it in your terminal from your project directory.
- Cursor: click ‘Add to Cursor’ to open the editor with BetterLinks already filled in, then confirm the install when Cursor asks. The button uses a
cursor://deep link, so it only works if Cursor is already installed on the same machine. If nothing happens when you click it, install Cursor first and try again. - VS Code: click ‘Add to VS Code’ and confirm the install in the same way. The same rule applies: the button uses a
vscode://deep link and requires VS Code to be installed locally.
The Reset token button on the right is your emergency switch. Use it if you suspect the connection token has leaked. Resetting disconnects Claude Code, Cursor, VS Code and Claude Desktop, and each of them will need the new command to reconnect. Apps connected through OAuth are not affected.
Part 2: Connect BetterLinks MCP with Claude #
Claude connects through a custom connector, which means you paste the URL once and approve the connection through a secure sign-in screen. The steps below use Claude on the web, and the flow is identical on desktop.
Step 4: Open the Claude Settings Panel #
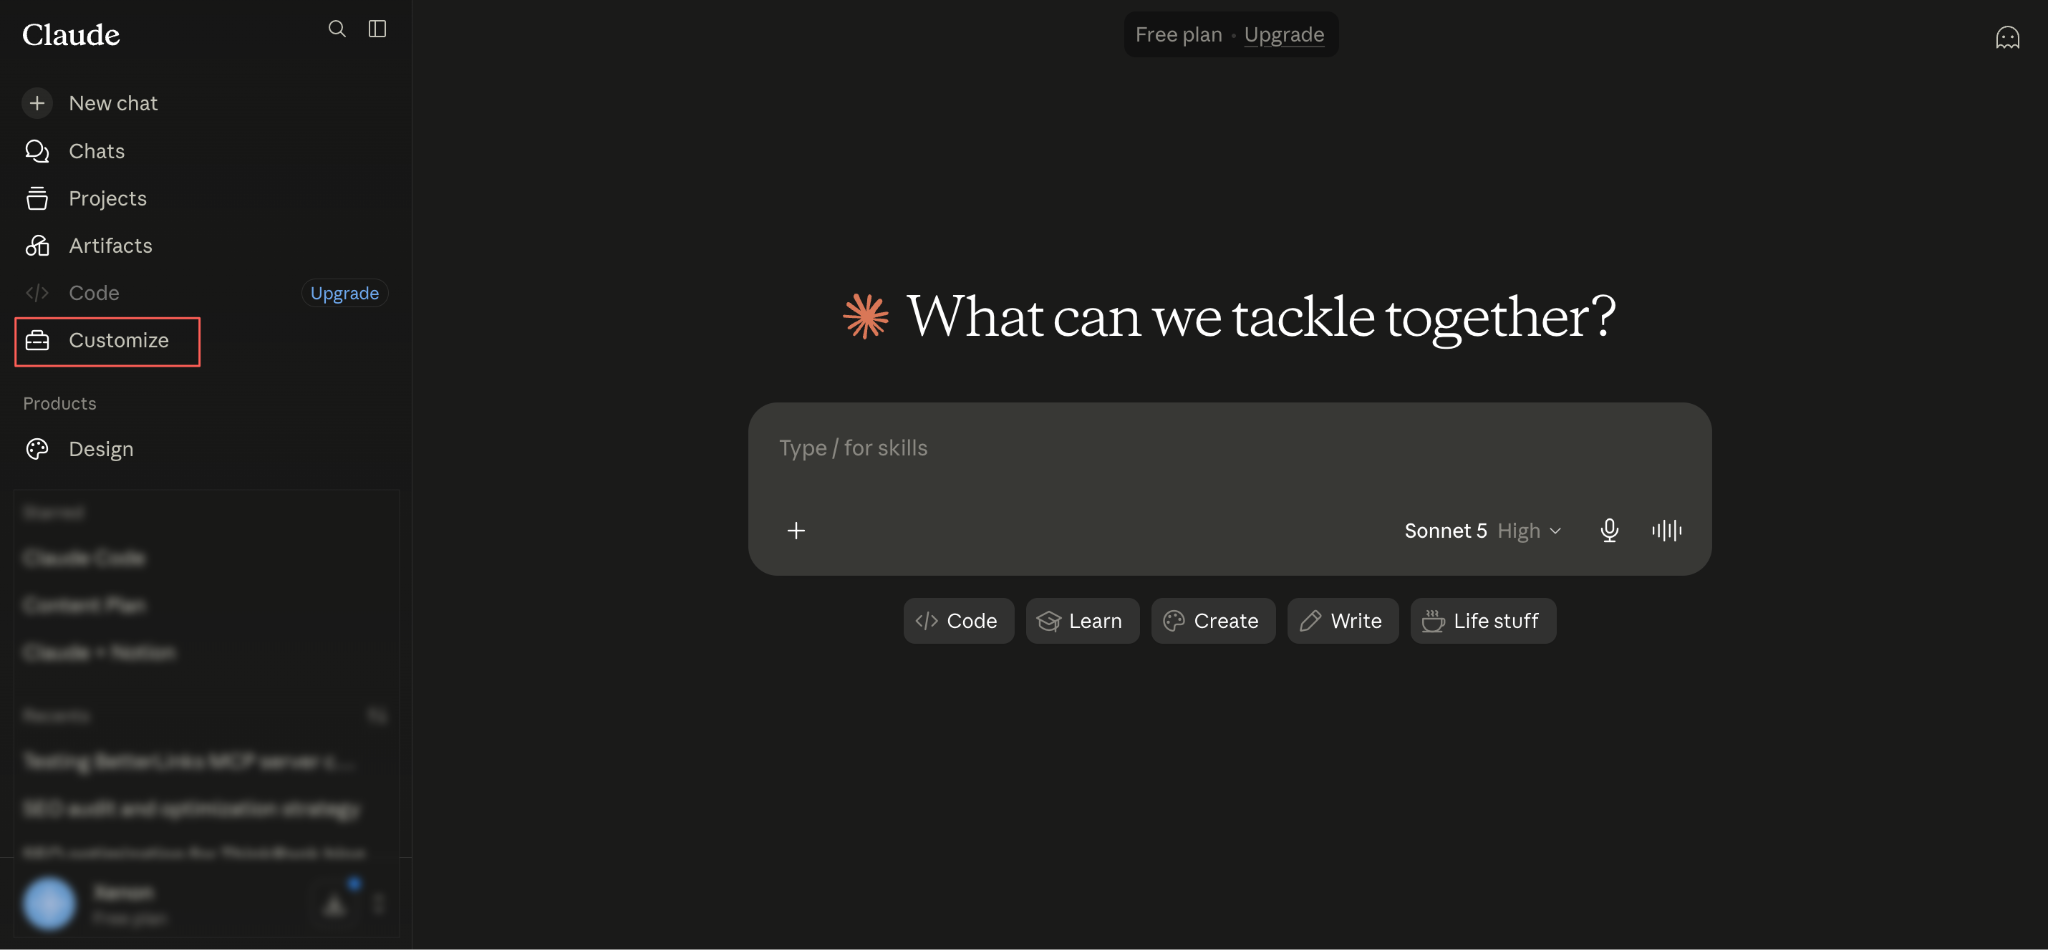
Open Claude and click ‘Customize‘ in the left sidebar to open the settings panel where connectors are managed.
Step 5: Add a Custom Connector #
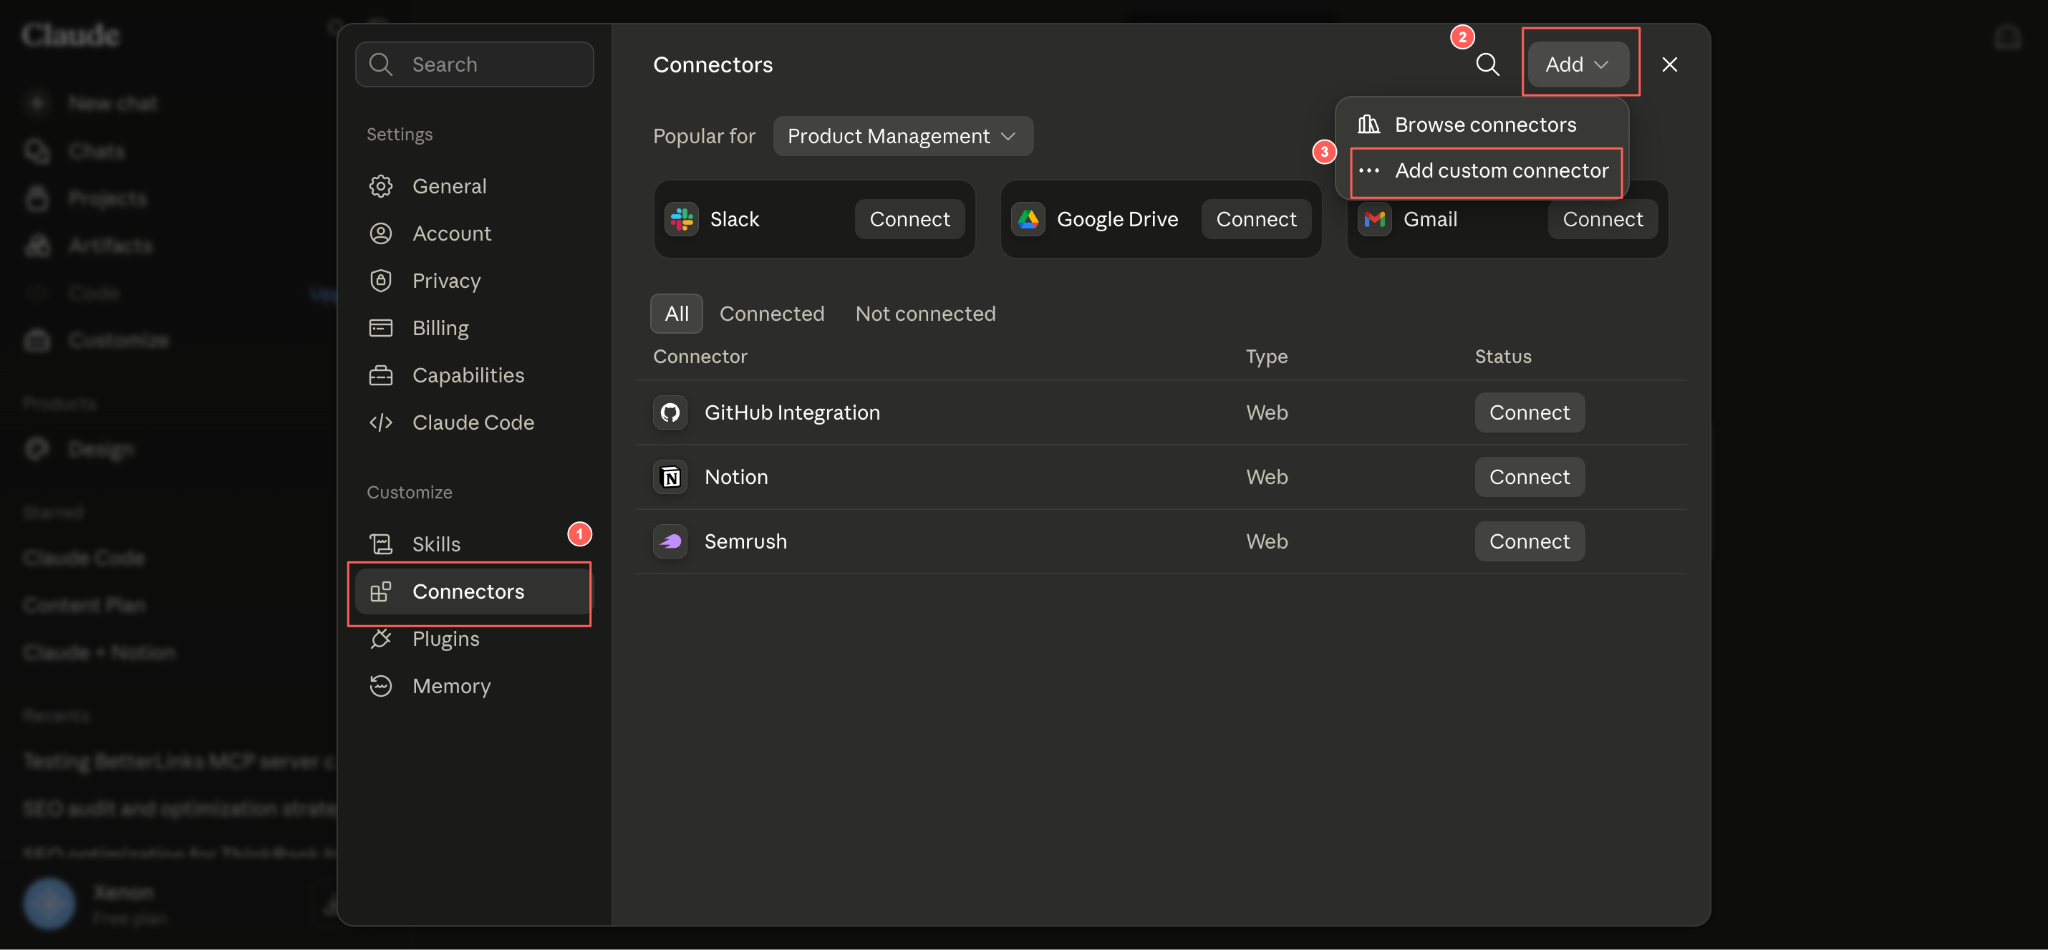
Inside the settings panel, select ‘Connectors‘ from the Customize group on the left. Then click the ‘Add‘ dropdown in the top right corner and choose ‘Add custom connector,’ following the numbered order in the screenshot. Browse connectors only lists the verified directory, so a self-hosted server such as BetterLinks always goes through the custom option.
Step 6: Enter Your Connector Details #
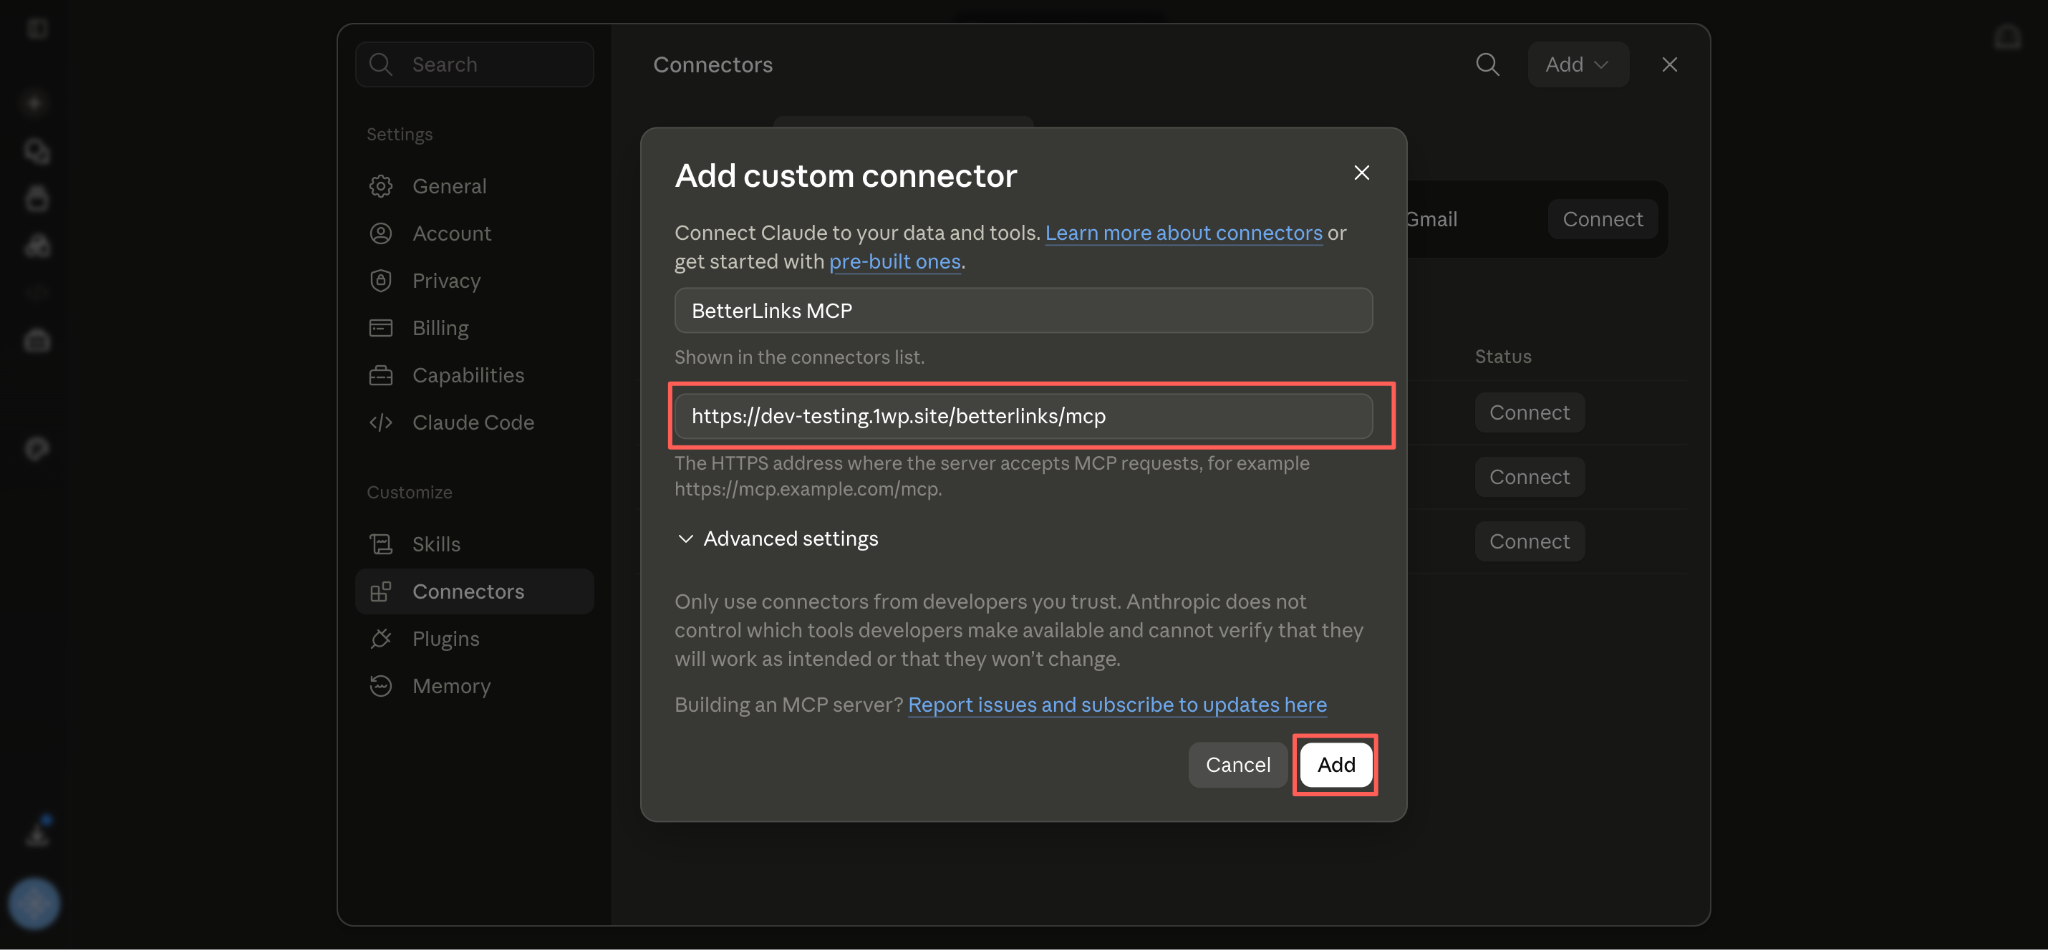
In the ‘Add custom connector‘ dialog, type a clear name in the first field so you can recognize it later in your connectors list. BetterLinks MCP, an example, works well.
In the second field, paste the connector URL you copied in Step 2. It should look like https://yoursite.com/betterlinks/mcp. Leave Advanced settings untouched unless you have a specific reason to change them, then click ‘Add‘.
Step 7: Connect & Approve Access #
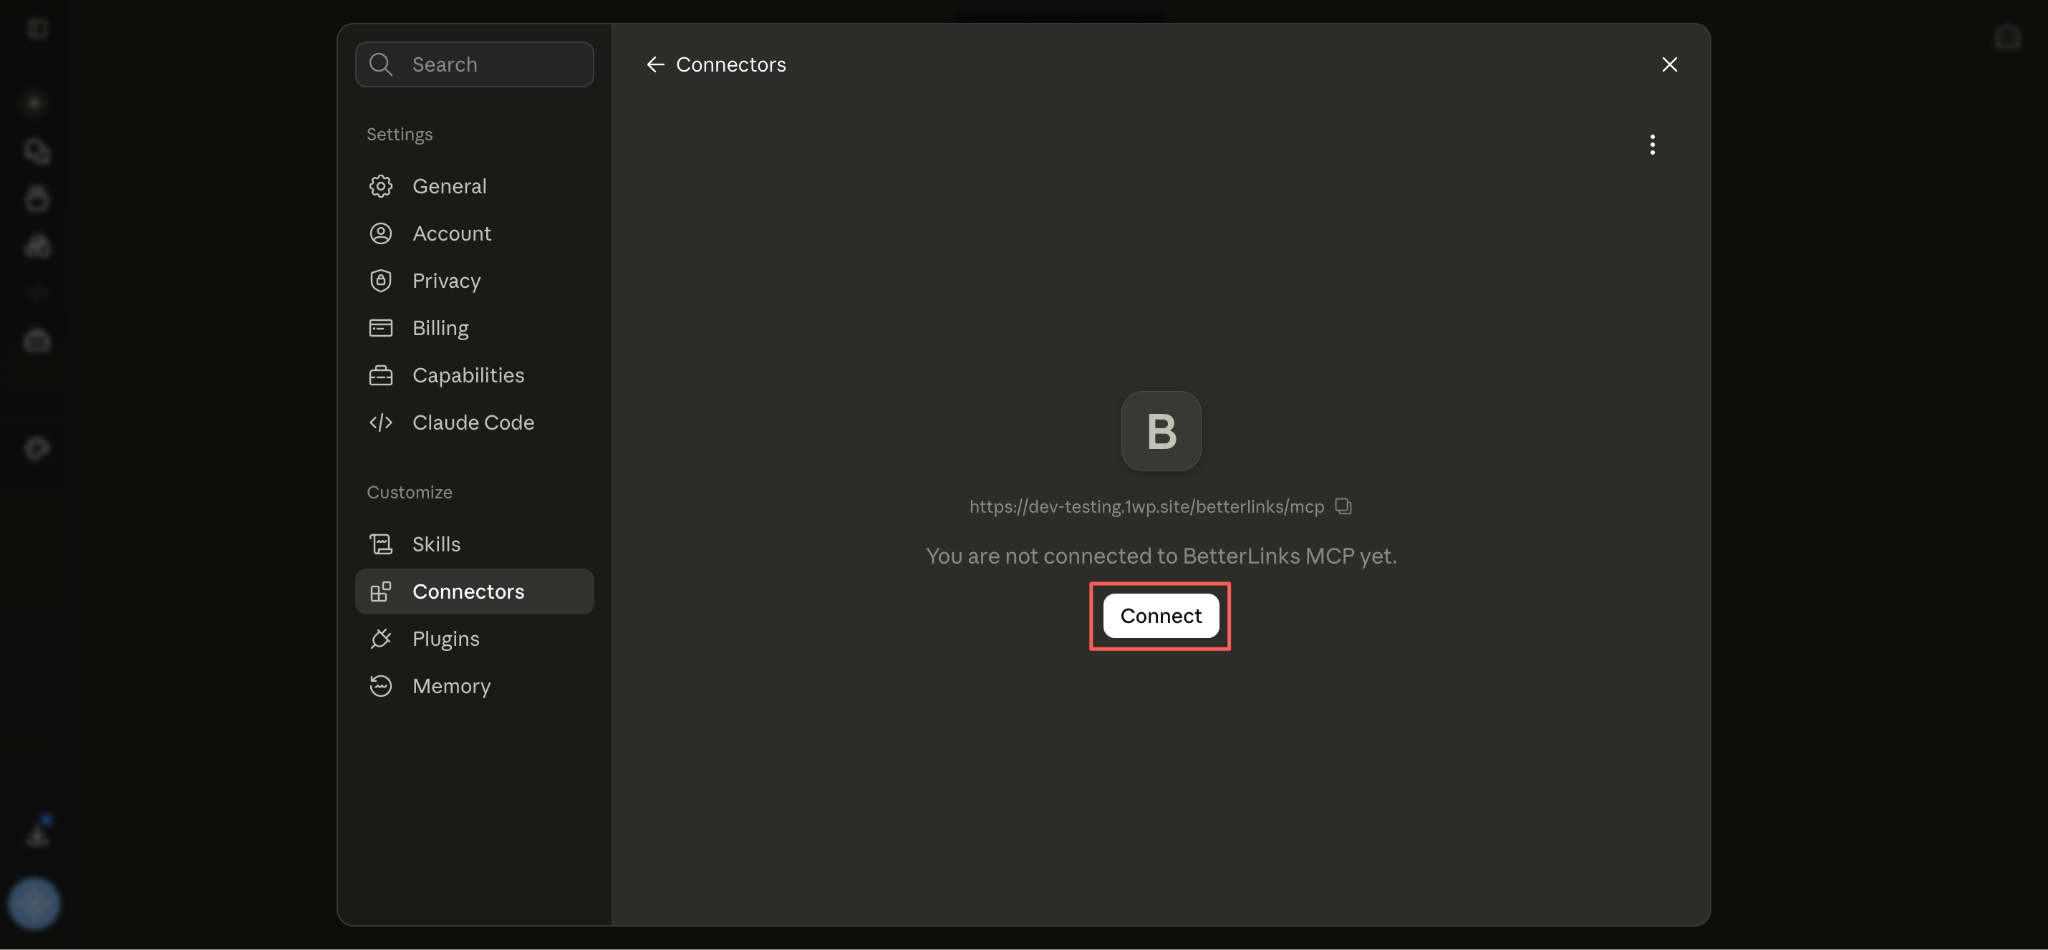
Claude opens the connector page and shows ‘You are not connected to BetterLinks MCP yet‘. Click Connect to start the sign-in process.
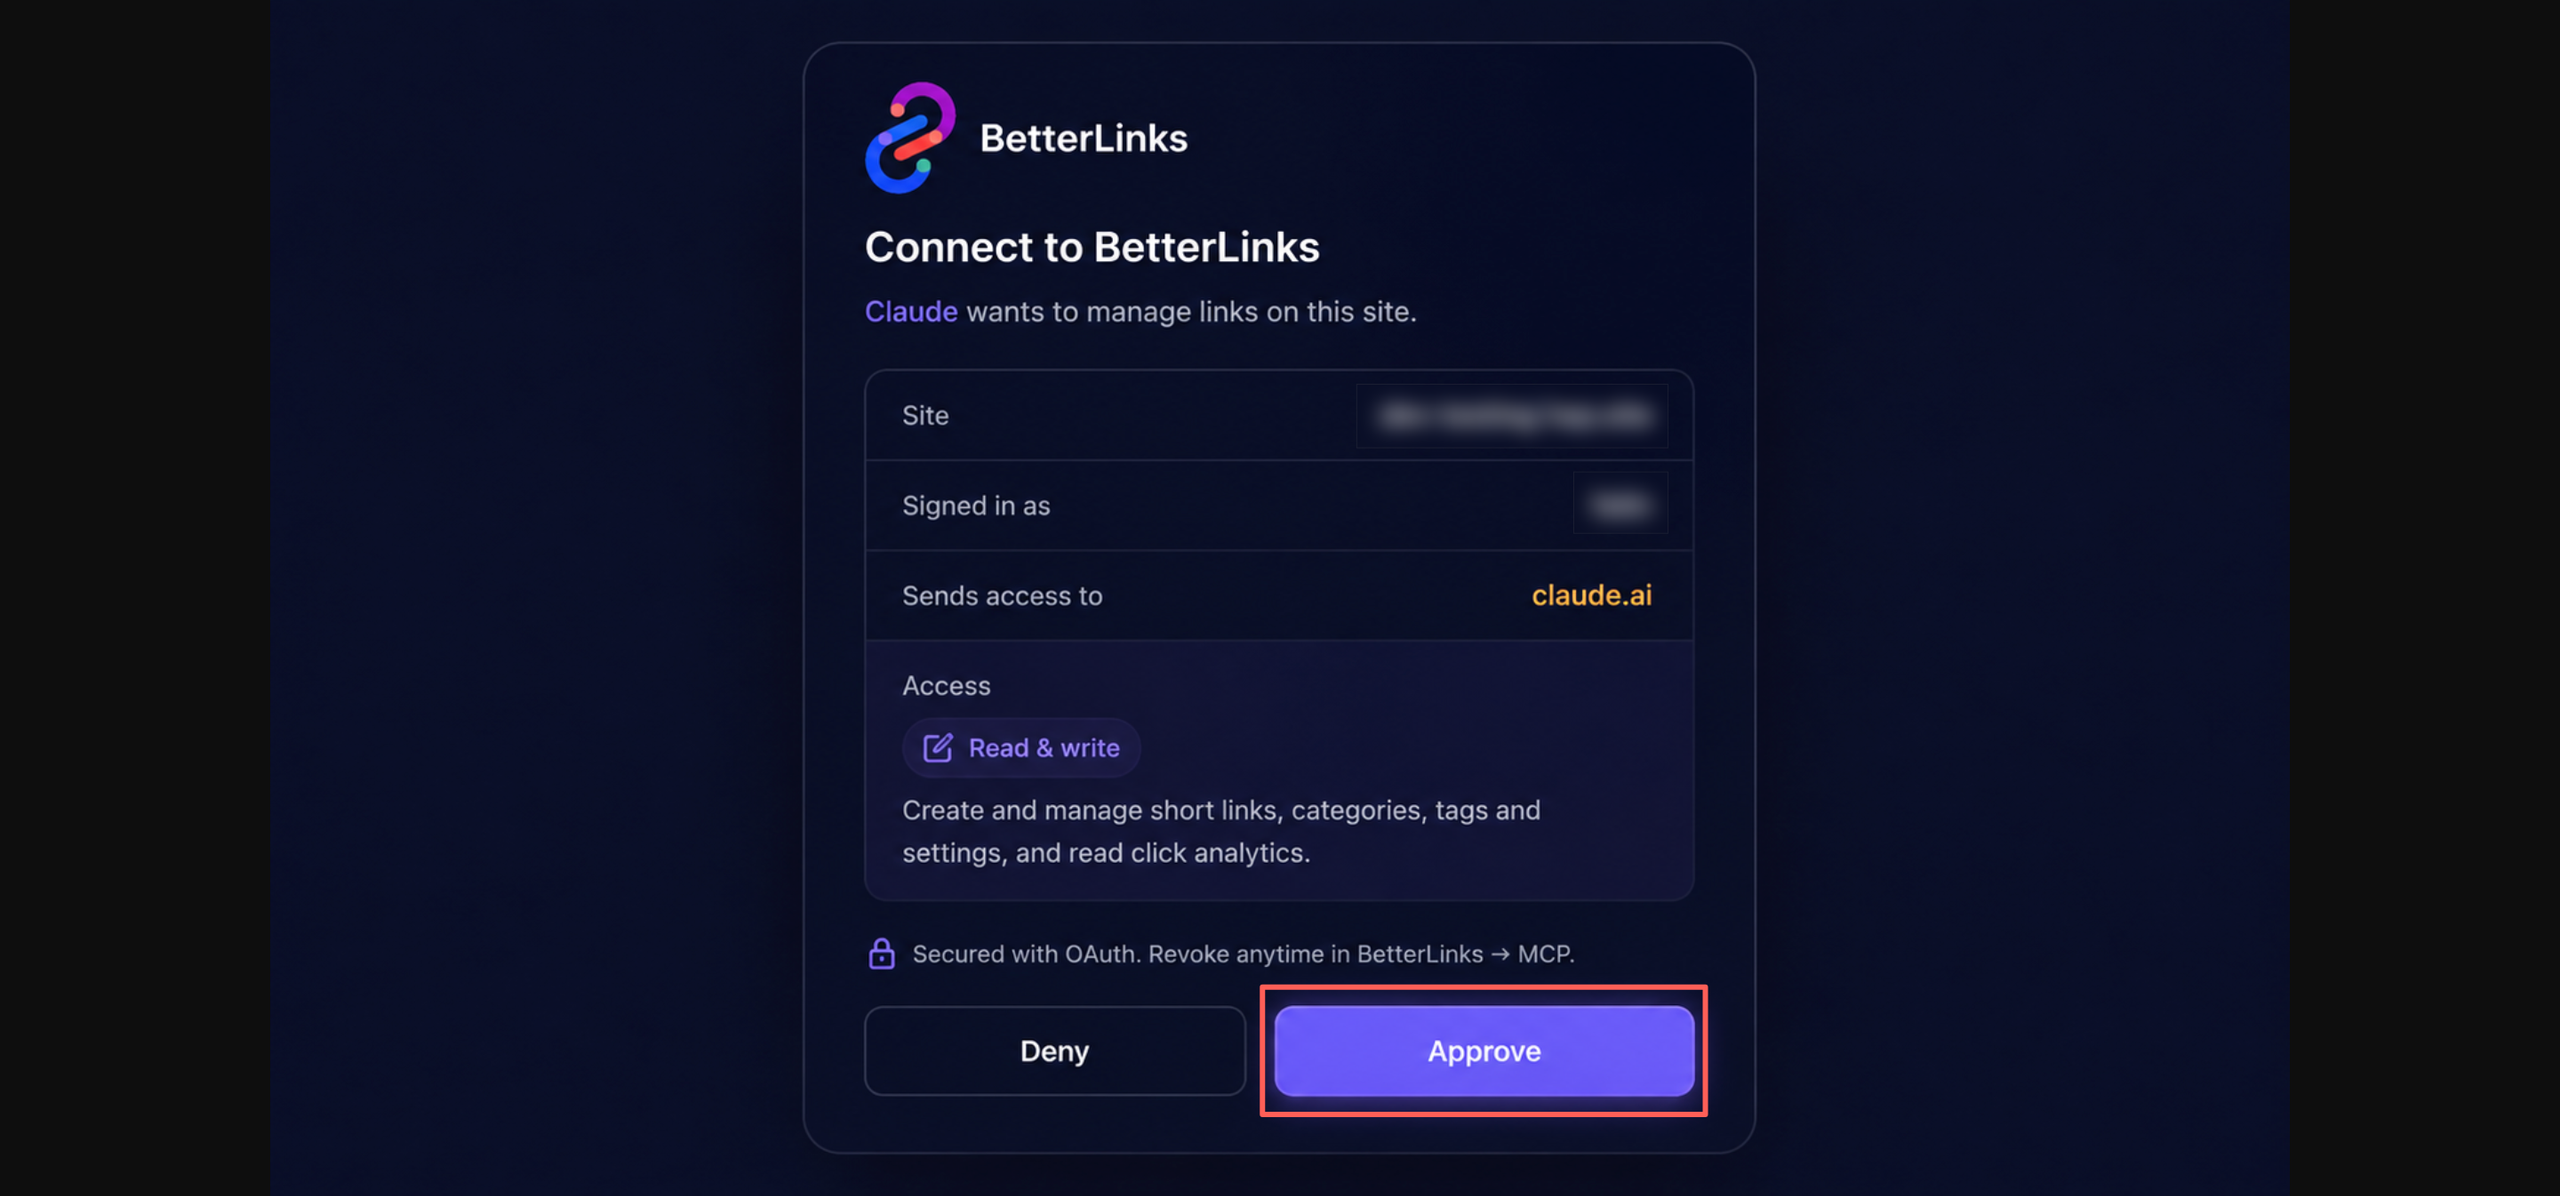
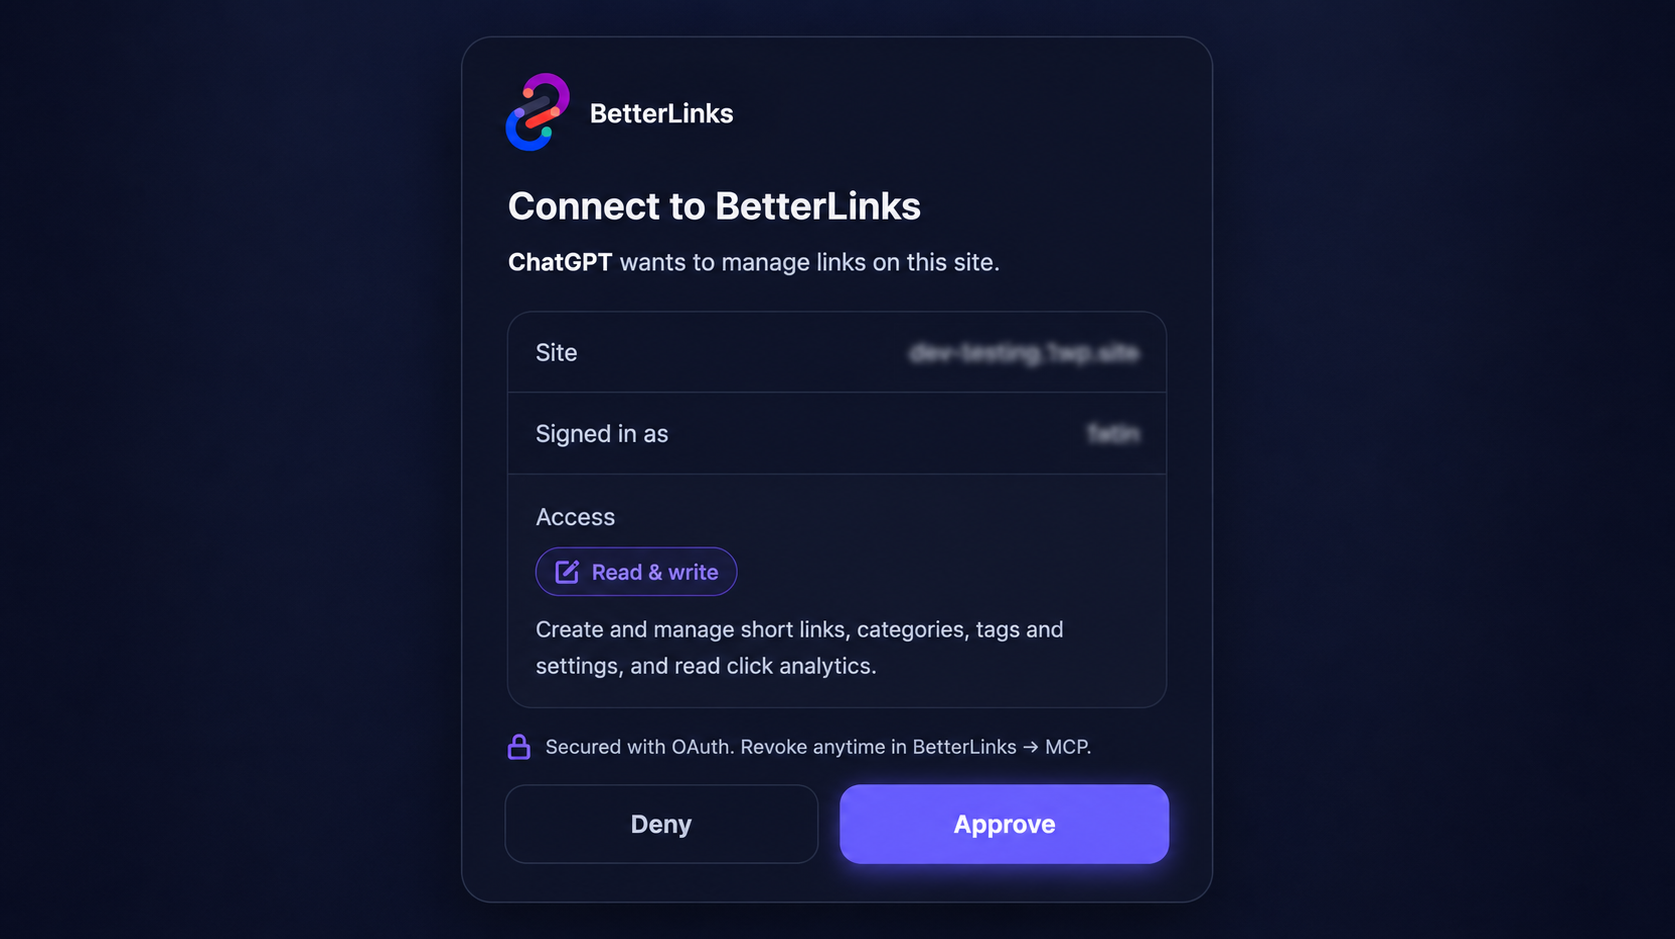
A BetterLinks approval screen opens next. Check the ‘Site‘ and ‘Signed in as‘ details to confirm you are approving the right site with the right account and review the ‘Read & write‘ access scope. When everything looks correct, click ‘Approve’.
OAuth token lifetime: OAuth access tokens expire after one hour, and refresh tokens rotate automatically. Well-behaved clients such as Claude and ChatGPT handle this in the background, so you should not need to sign in again. If you see a ‘please sign in again’ prompt after roughly an hour of idle time, it is the normal refresh flow and does not mean the connection is broken.
Step 8: Review the Tool Permissions #
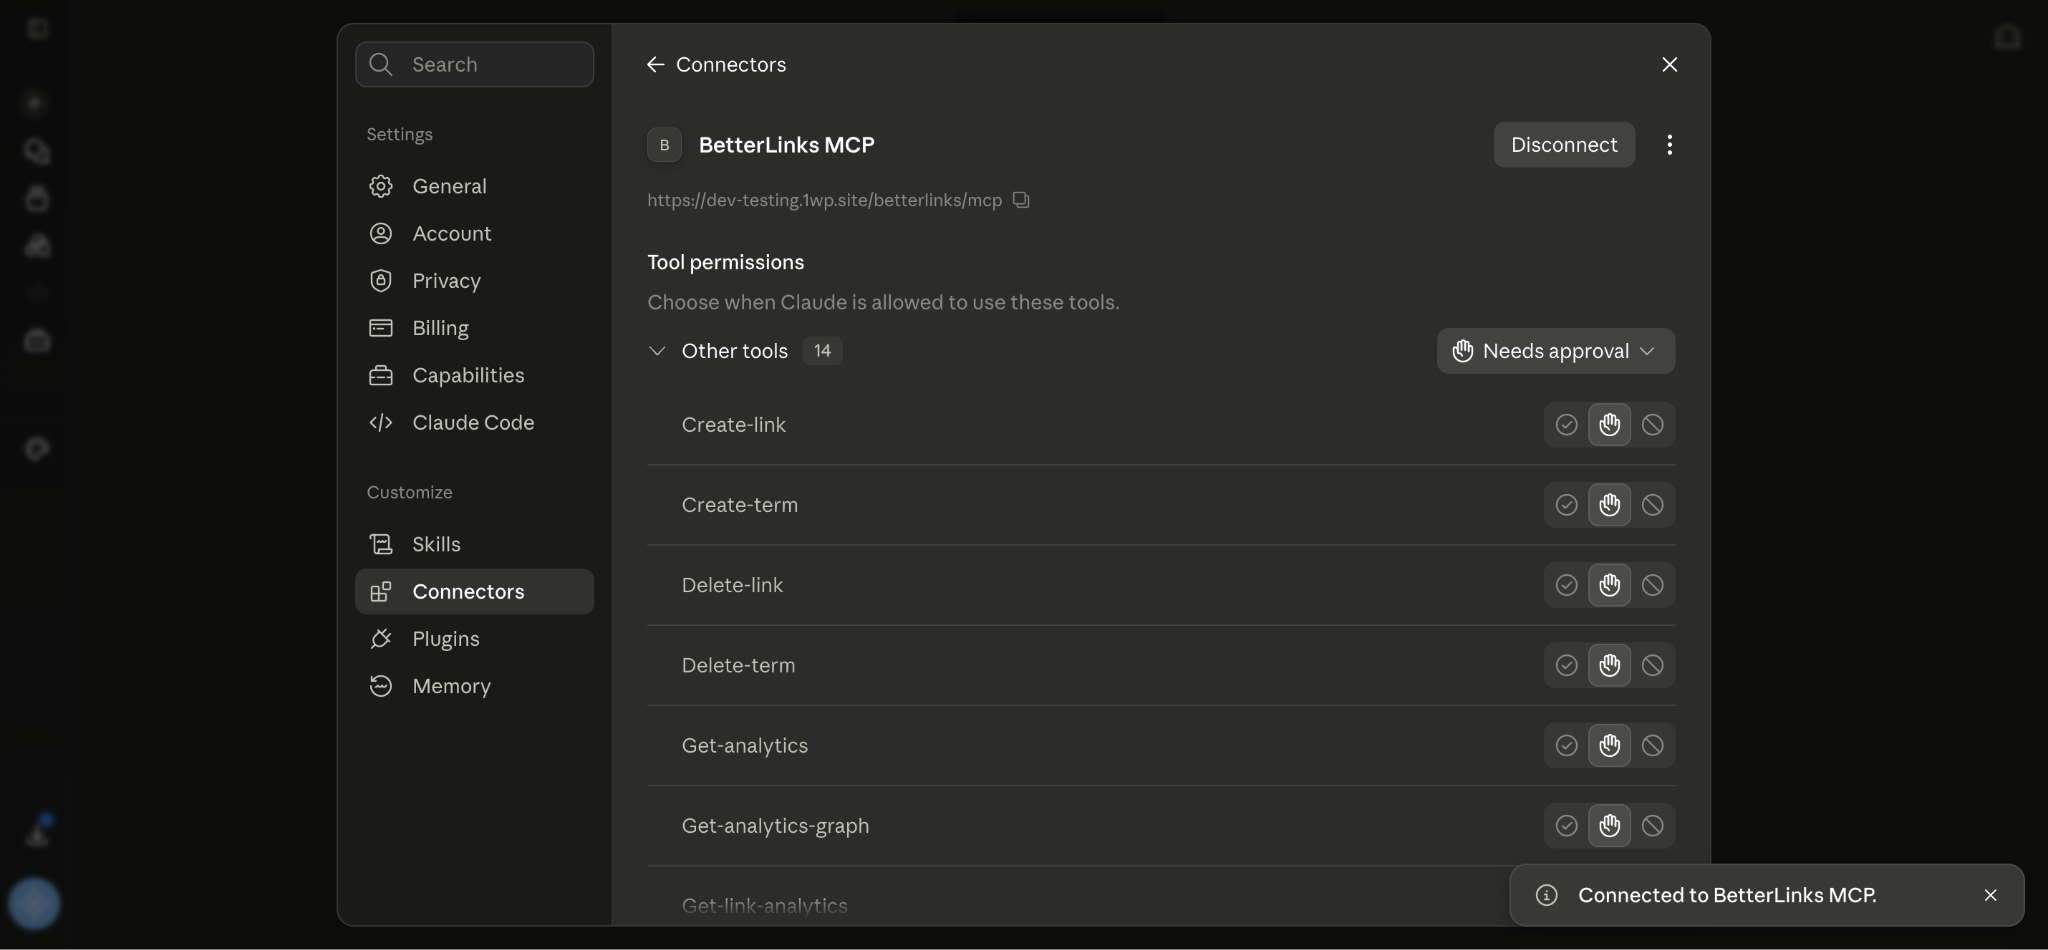
Claude returns to the connector page with a ‘Connected to BetterLinks MCP‘ confirmation in the corner, and all 14 BetterLinks tools are now listed under Tool permissions.
Each tool has three permission states: allow automatically, ask for approval or block. The default is Needs approval, which asks you before every call. It is good practice to keep destructive tools such as ‘Delete-link’ and ‘Delete-term’ on ‘Needs approval’, while read-only tools such as ‘Get-analytics’ can safely be set to ‘allow automatically’ if you use them often.
Step 9: Test the Connection in Claude #
Before you rely on the connection, run a quick read-only test. Start a new chat and send a prompt like the one below:
I’ve connected the BetterLinks MCP server. Please:
1. List all available BetterLinks tools you can see.
2. Pick one simple, read-only tool (for example: list links, get link stats, or get plugin info).
3. Call that tool with safe, non-destructive arguments and show me the raw response.
4. Tell me clearly: is the BetterLinks MCP working, partially working or not connected?
If you cannot see any BetterLinks tools or the call fails, show me the exact error message you get.
Claude loads the tool list and picks a safe tool, such as list-links, to run the test.
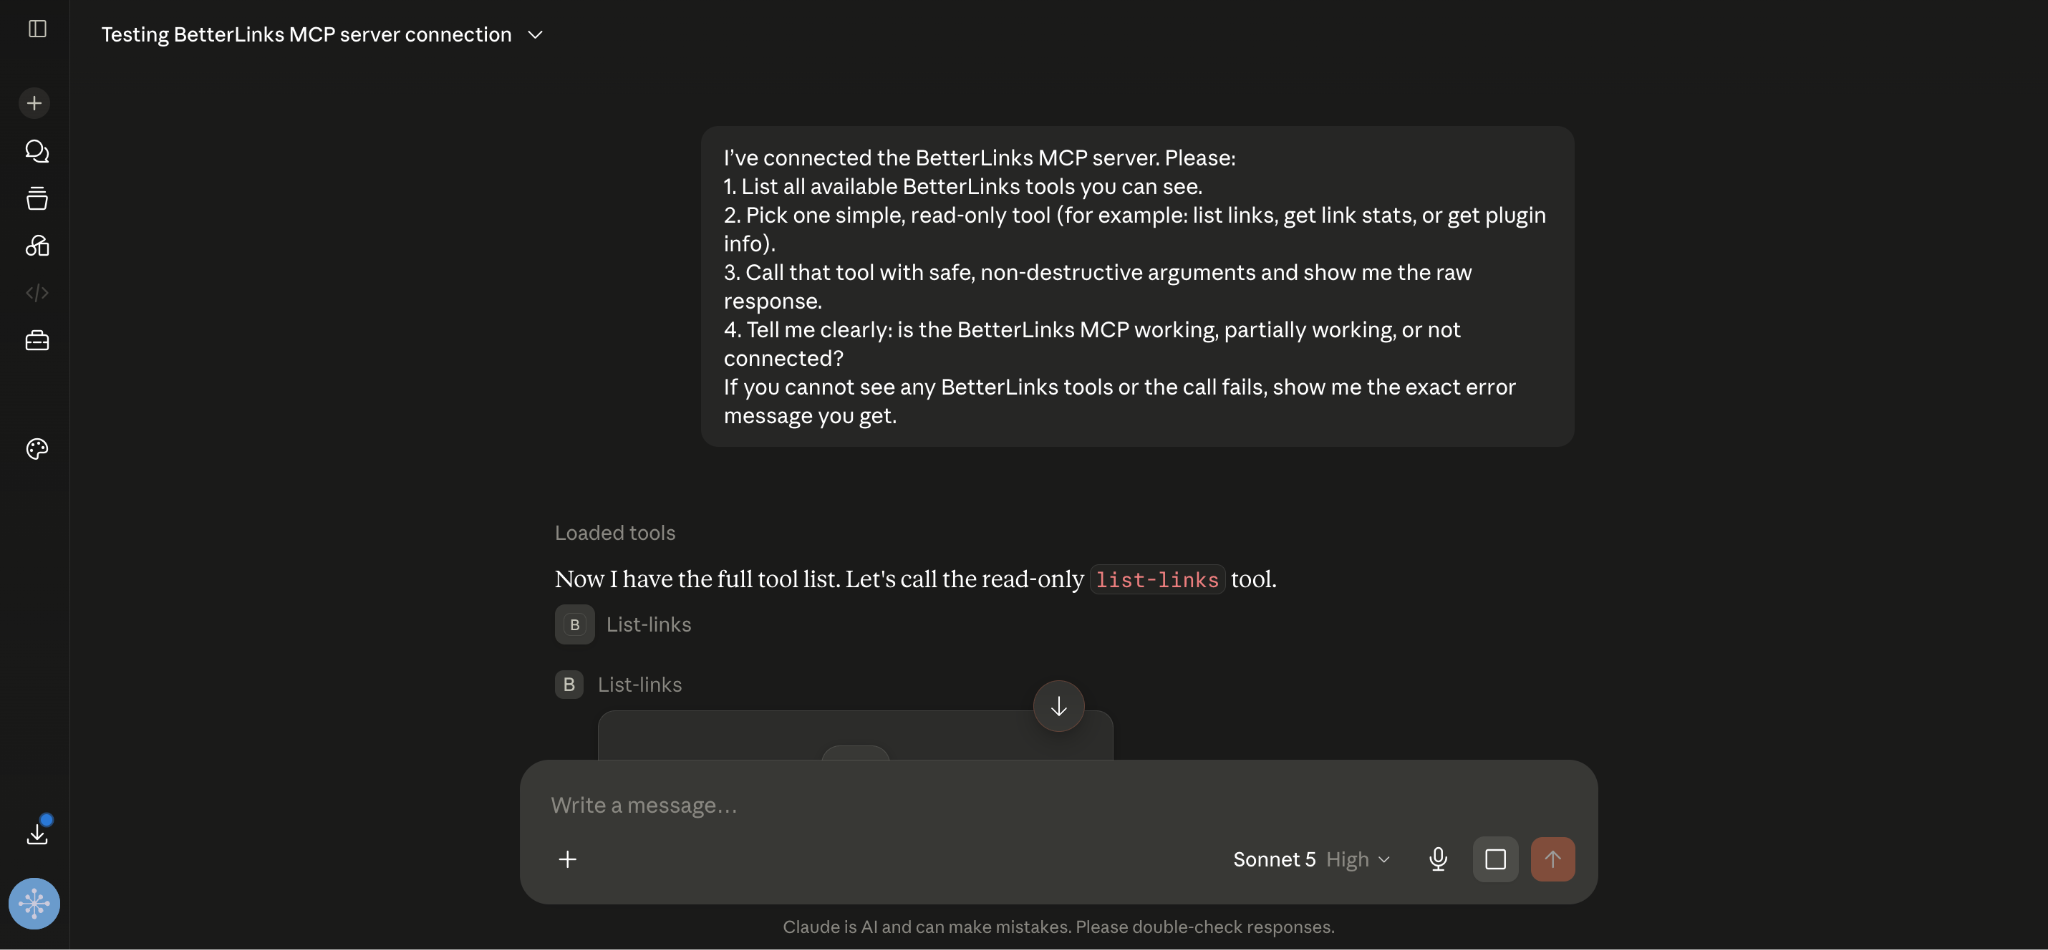
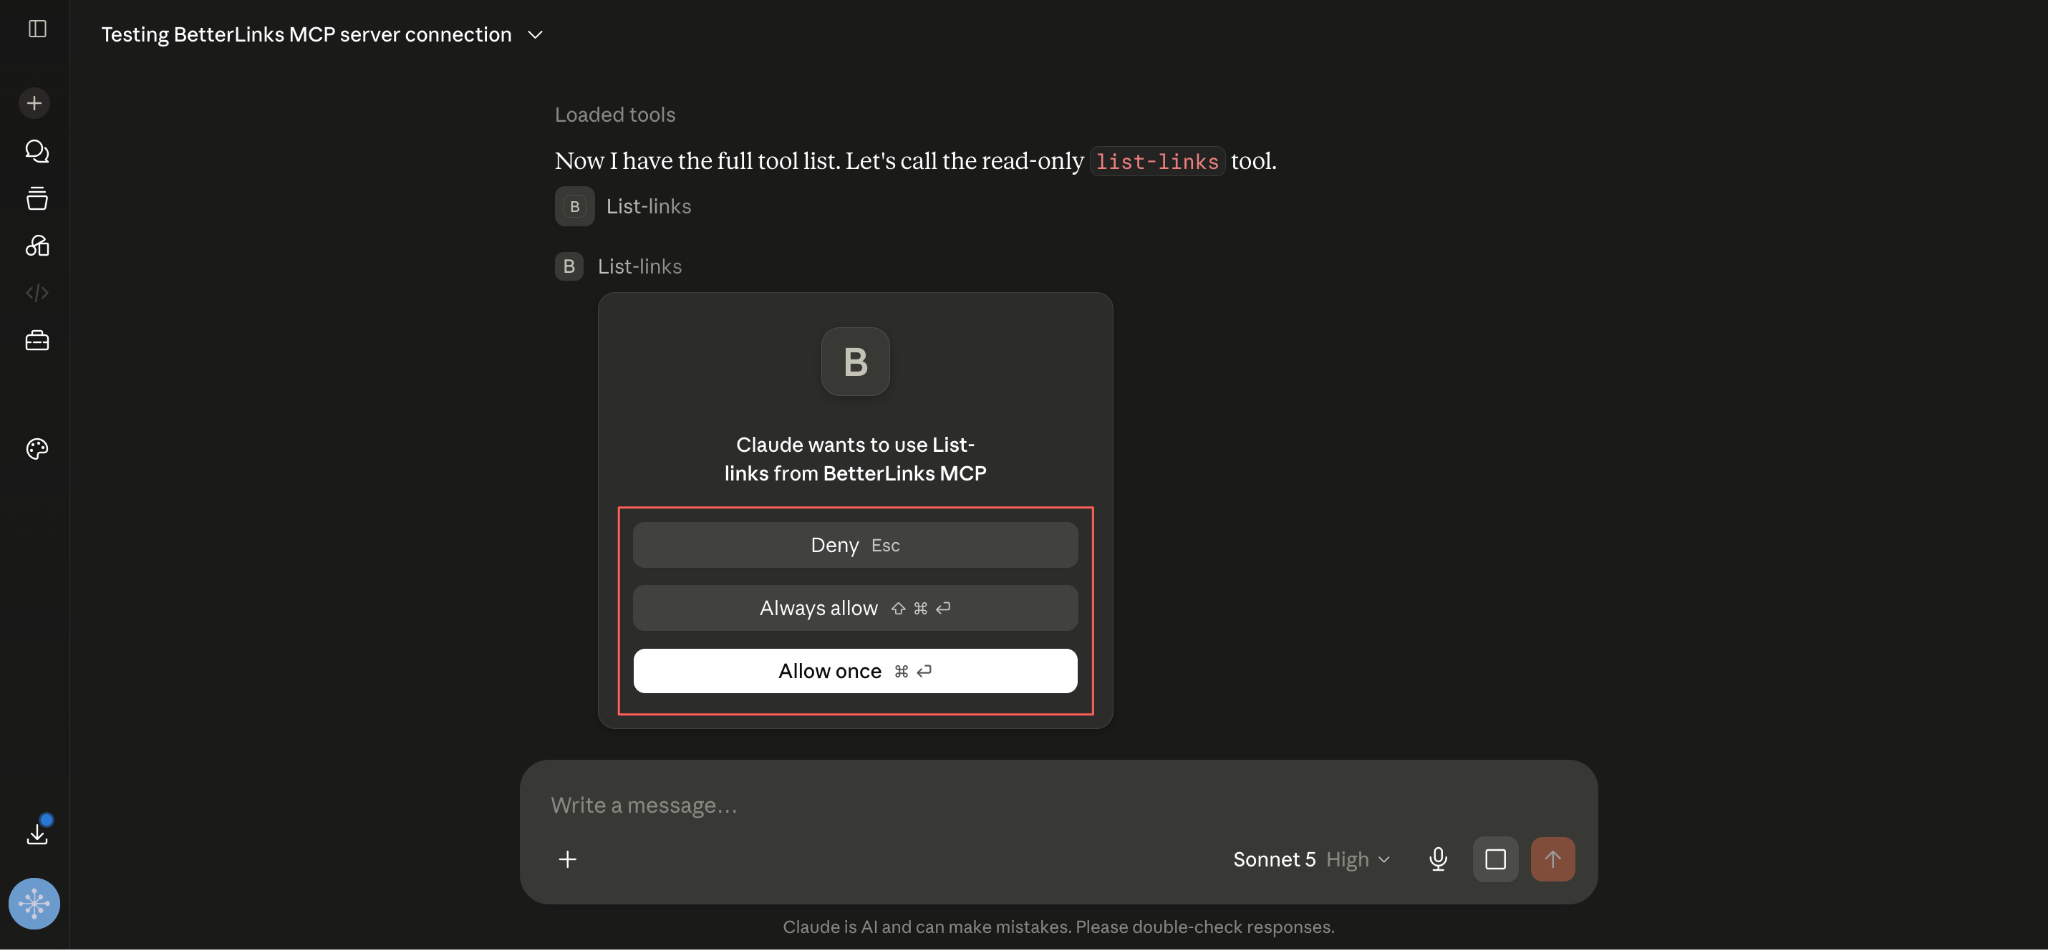
Because the tools are set to Needs approval, Claude asks for your permission first. Choose ‘Allow once‘ for a single run or ‘Always allow‘ if you want that tool to run without prompting in future. ‘Deny‘ blocks the call.
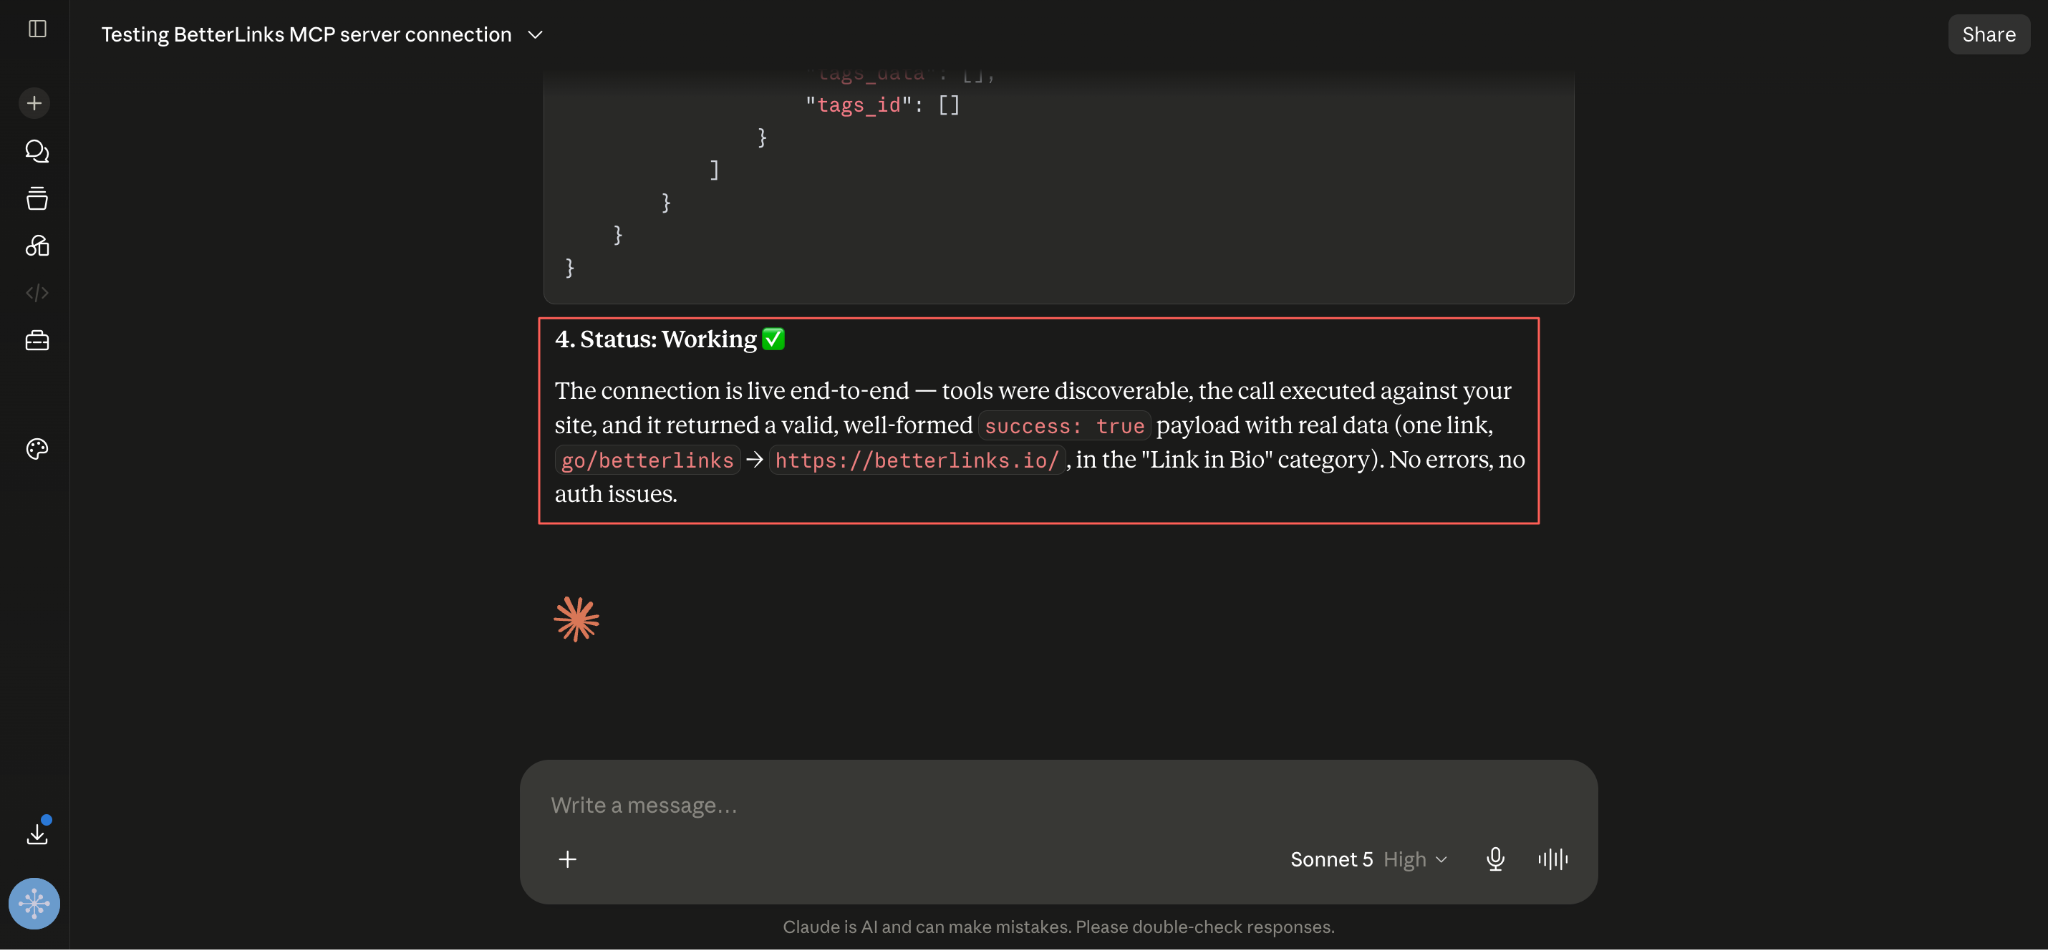
Claude then shows the raw JSON response and a plain-language verdict. A working connection returns a success payload containing your real link data, with no authentication errors.
Part 3: Connect BetterLinks MCP with ChatGPT #
ChatGPT connects to BetterLinks as a custom plugin. The connector URL is exactly the same one you copied in Step 2, but you need to switch on developer mode first.
Step 1: Open ChatGPT Settings #
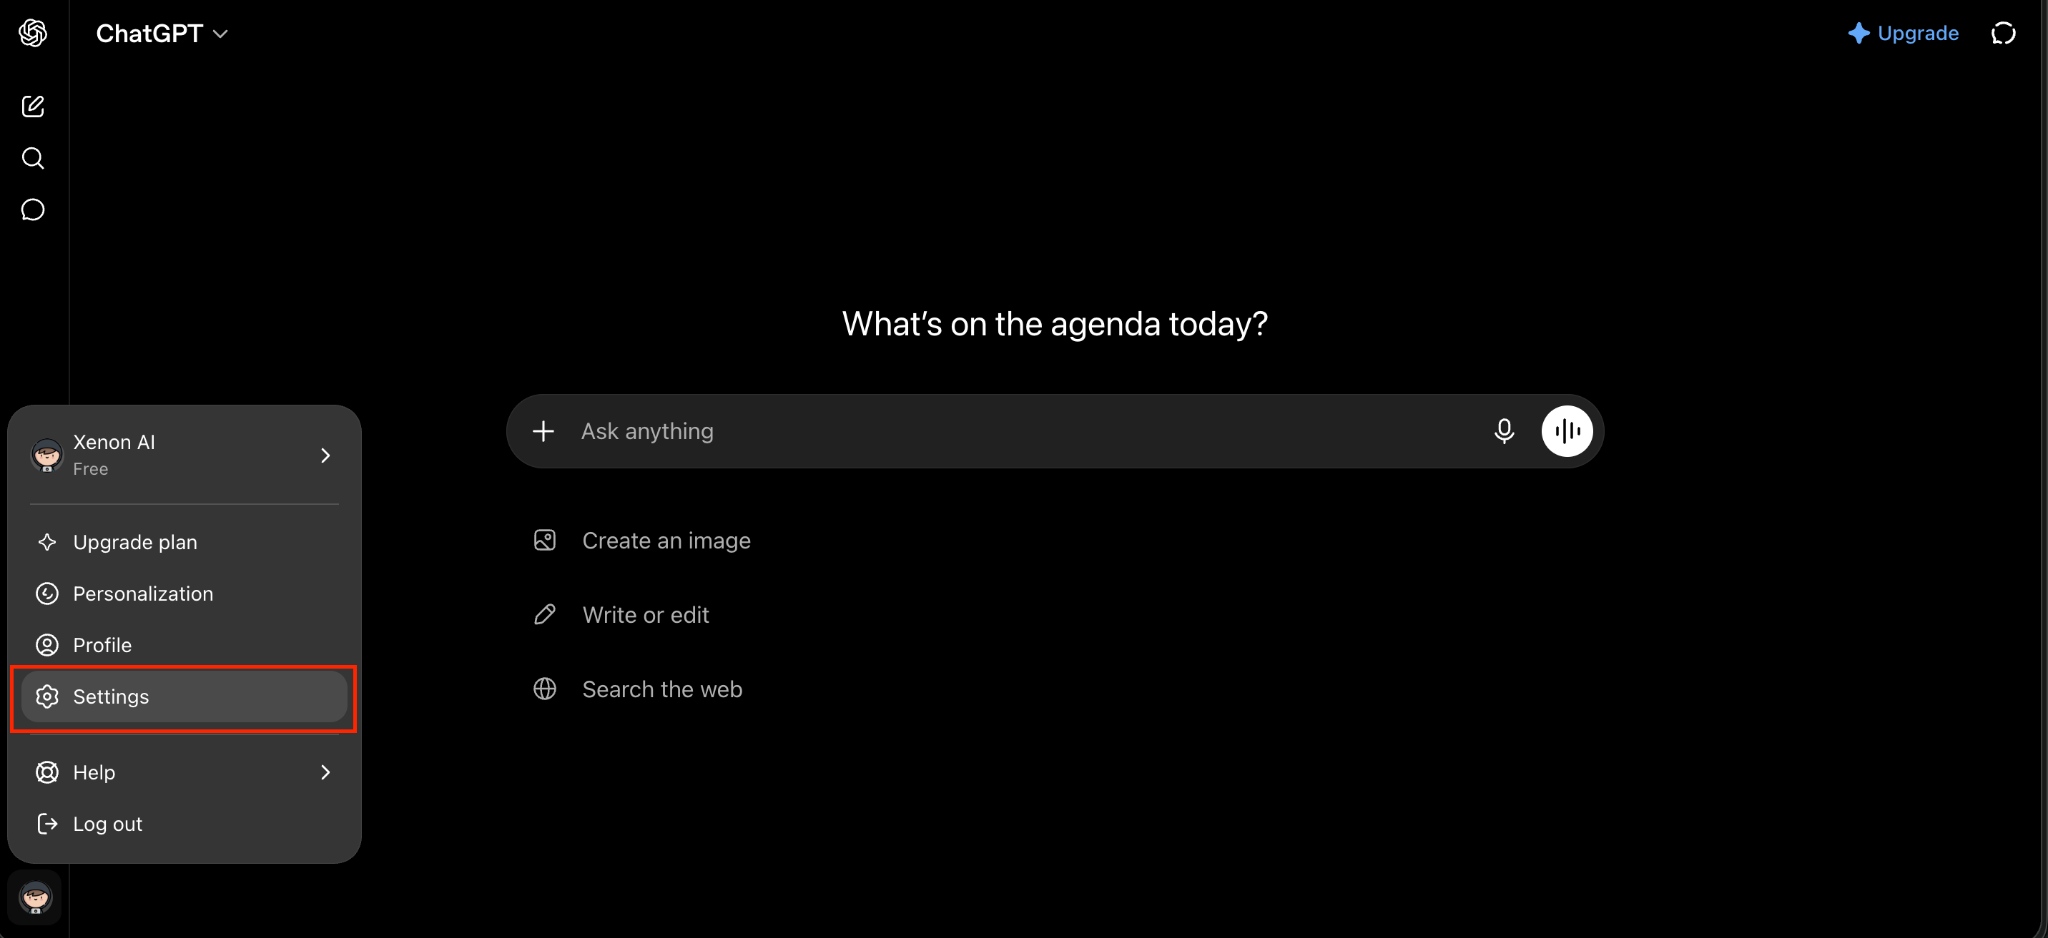
Open ChatGPT, click your profile icon in the bottom left corner and select ‘Settings‘.
Step 2: Turn On Developer Mode #
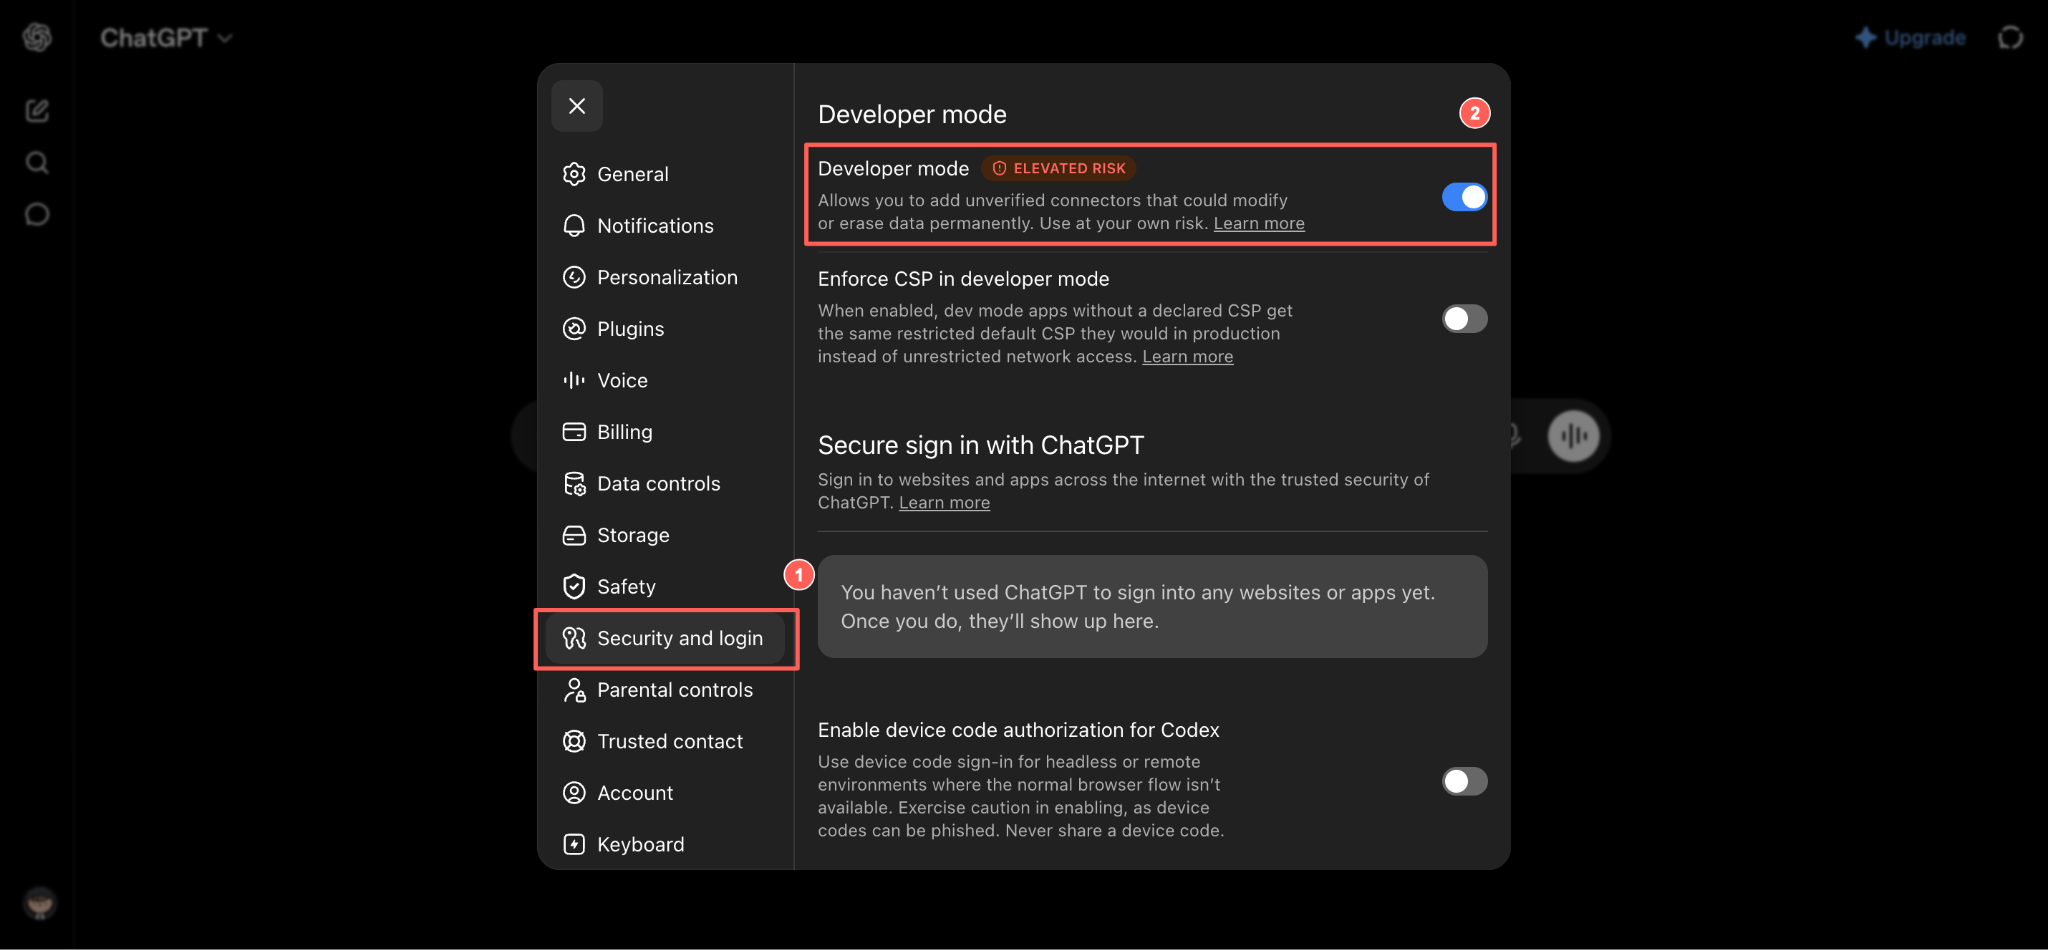
Go to ‘Security and login‘ in the settings sidebar, then switch on the ‘Developer mode‘ toggle at the top of the panel. This setting enables you to add a custom MCP server that is not part of the official directory.
Step 3: Add a New Plugin #
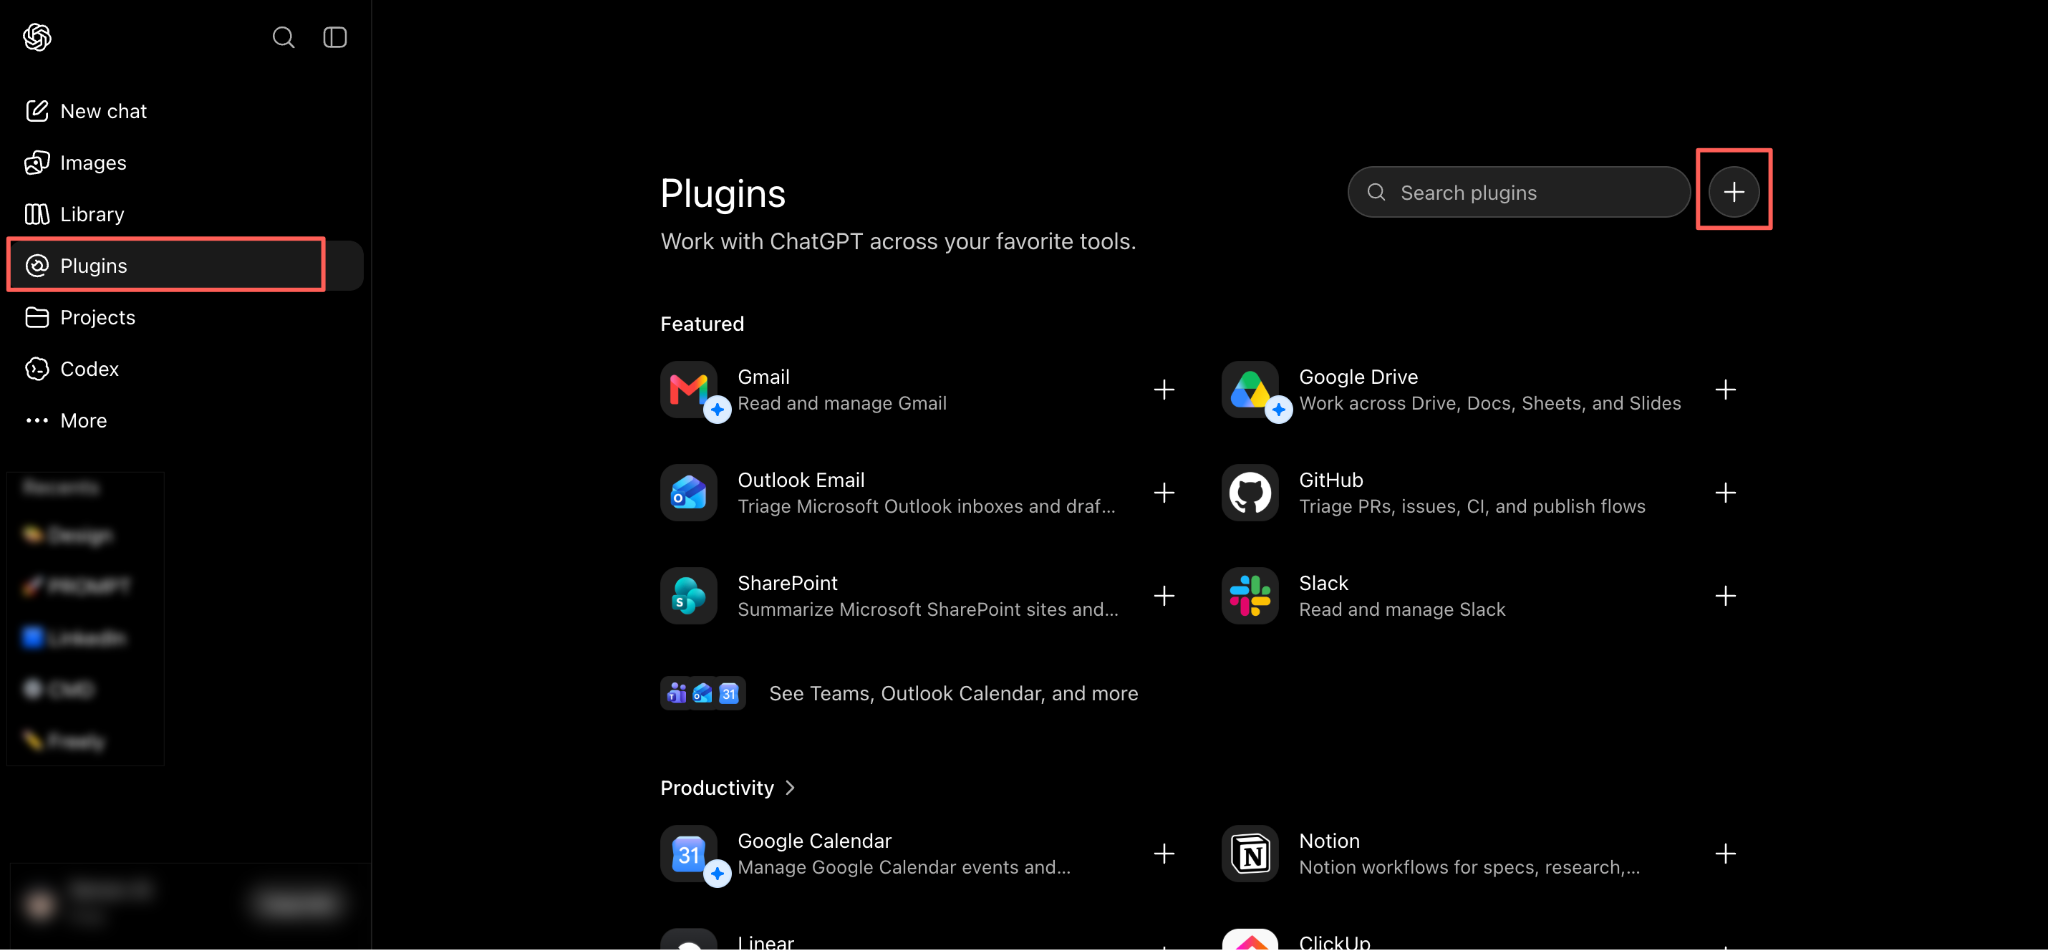
Open ‘Plugins‘ from the left sidebar. This screen lists every tool ChatGPT can work with. Click the + button next to the search field in the top right corner to create a new one.
Step 4: Fill In the Plugin Details #
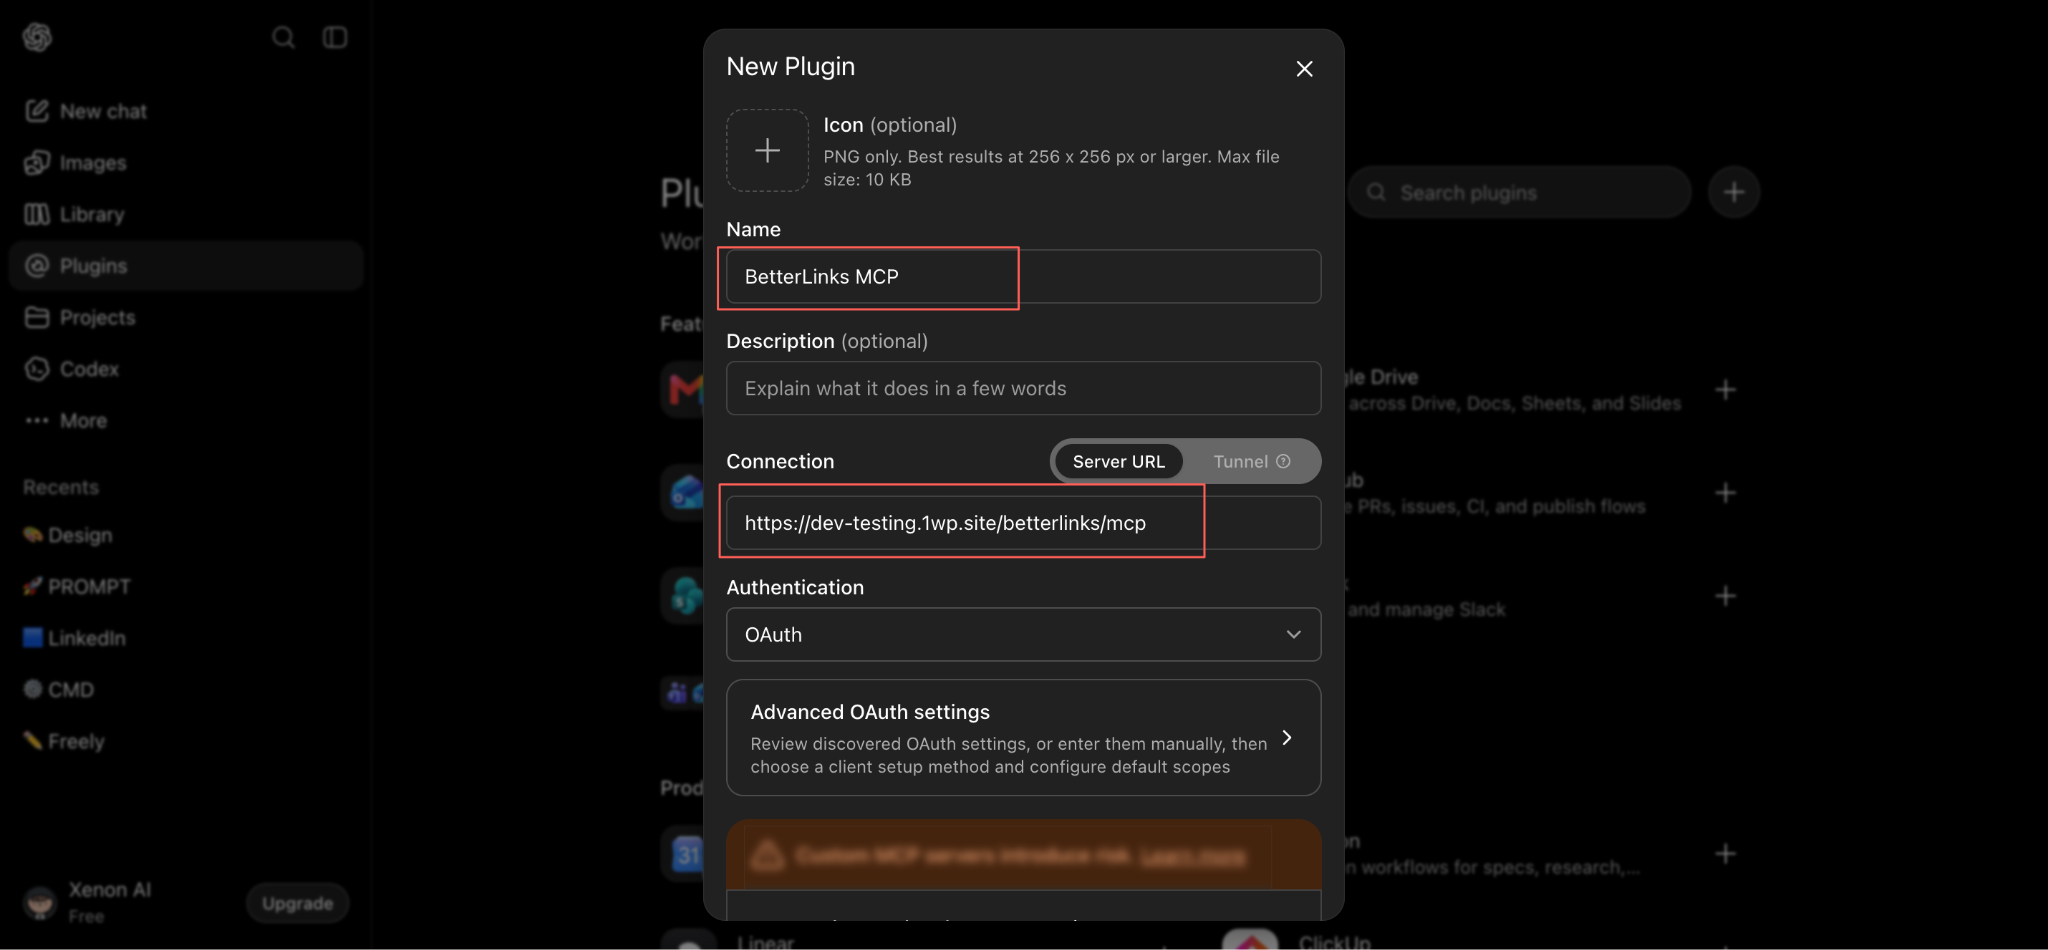
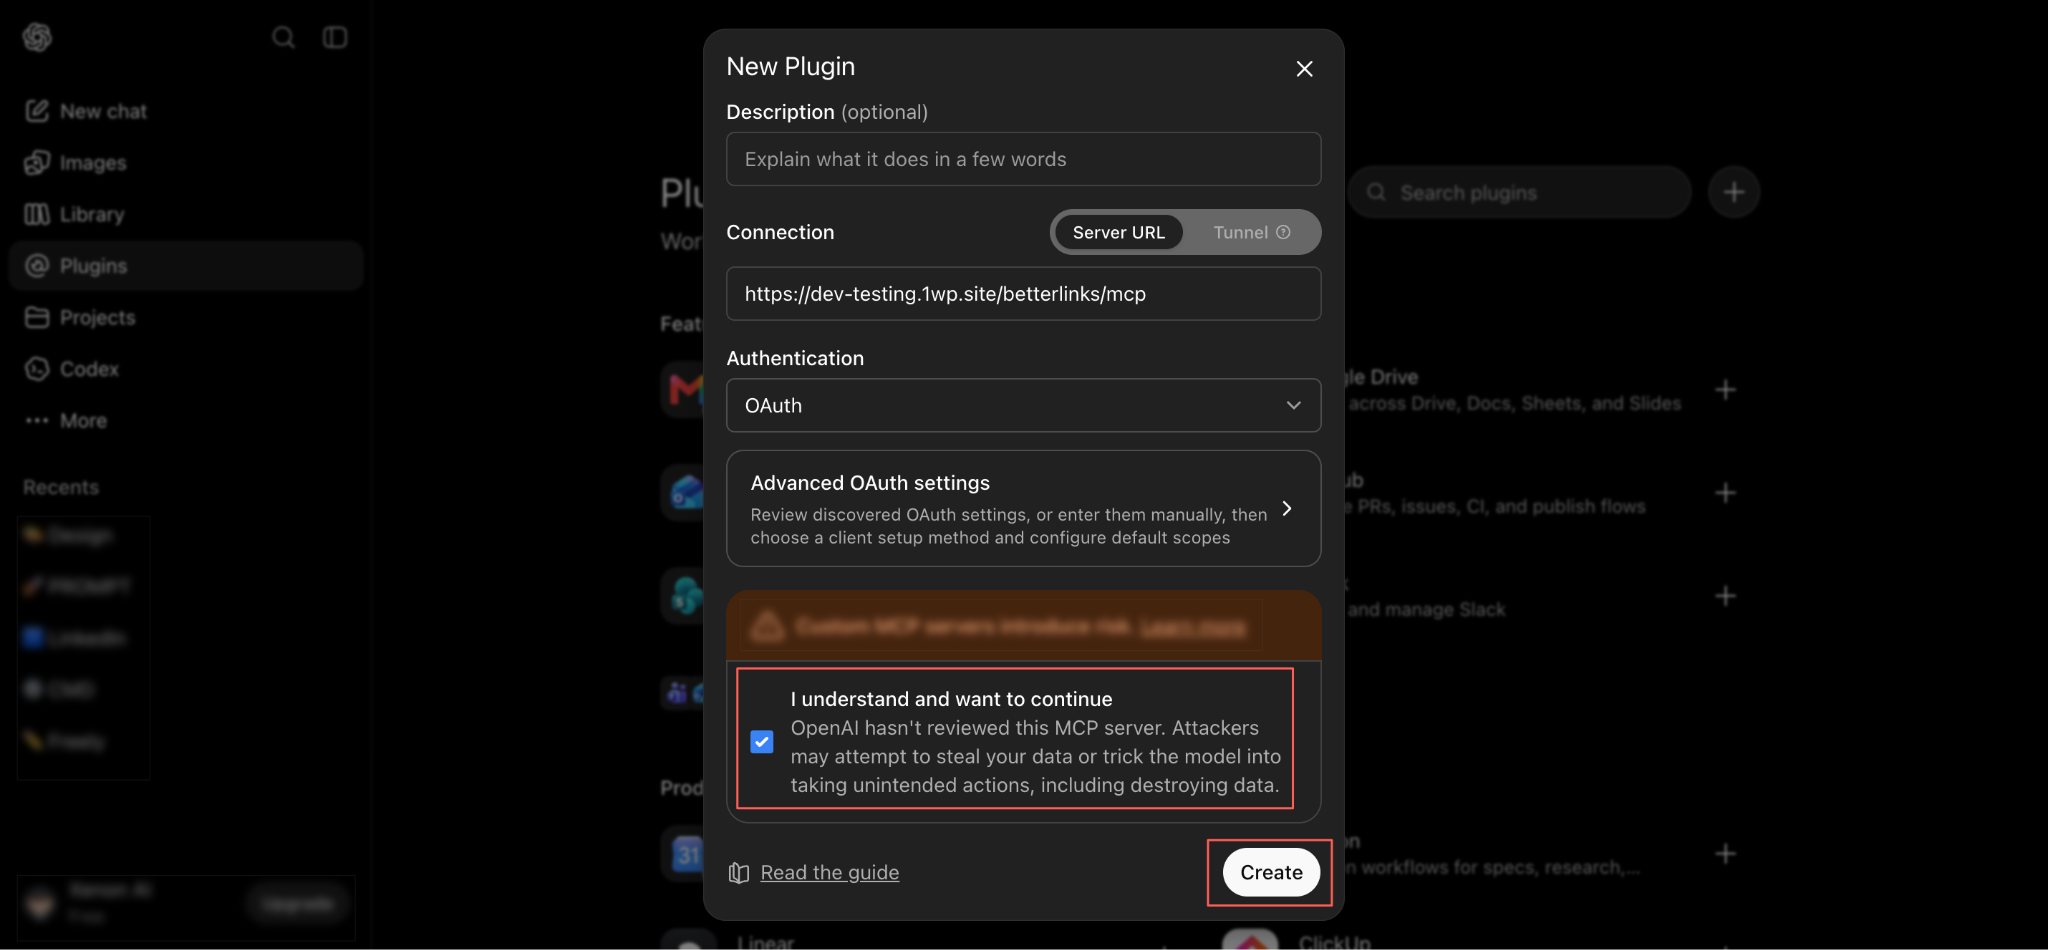
In the ‘New Plugin‘ dialog, enter a name such as ‘BetterLinks MCP‘ so you can identify it later. Keep the ‘Connection‘ type set to ‘Server URL‘ and paste the connector URL you copied in Step 2 into the field below it. Leave ‘Authentication‘ set to ‘OAuth‘, which is what BetterLinks uses to verify you.
Note: Adding an icon and a description is completely optional and has no effect on the connection.
Step 5: Confirm & Create the Plugin #
Scroll down inside the same dialog until you reach the risk notice. Tick the ‘I understand and want to continue‘ checkbox to acknowledge that OpenAI has not reviewed this server, then click ‘Create‘.
Step 6: Sign In and Approve Access #
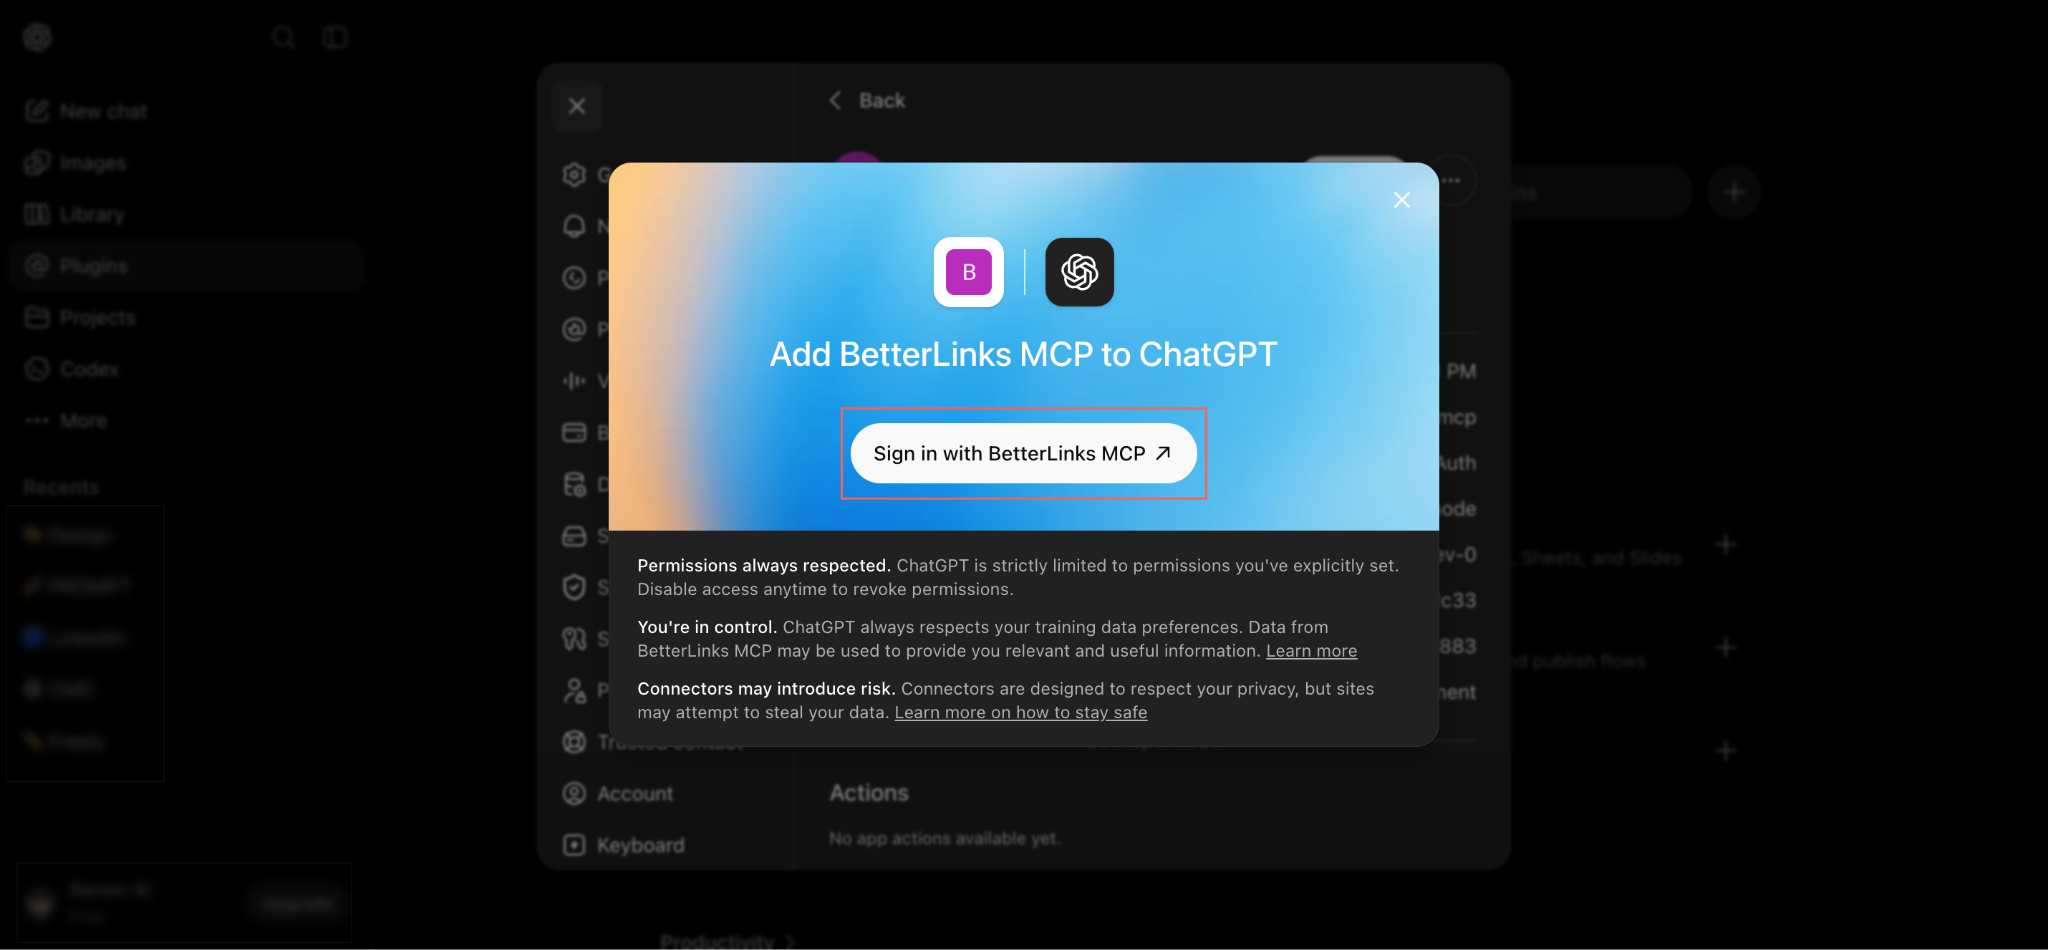
ChatGPT now asks you to authorize the connection. Click ‘Sign in with BetterLinks MCP‘ to open the approval screen for your site.
The same BetterLinks approval screen you saw with Claude opens, this time requesting access for ‘ChatGPT‘. Confirm the site and account details, review the ‘Read & write’ scope, then click ‘Approve‘.
Step 7: Confirm the Plugin Is Connected #
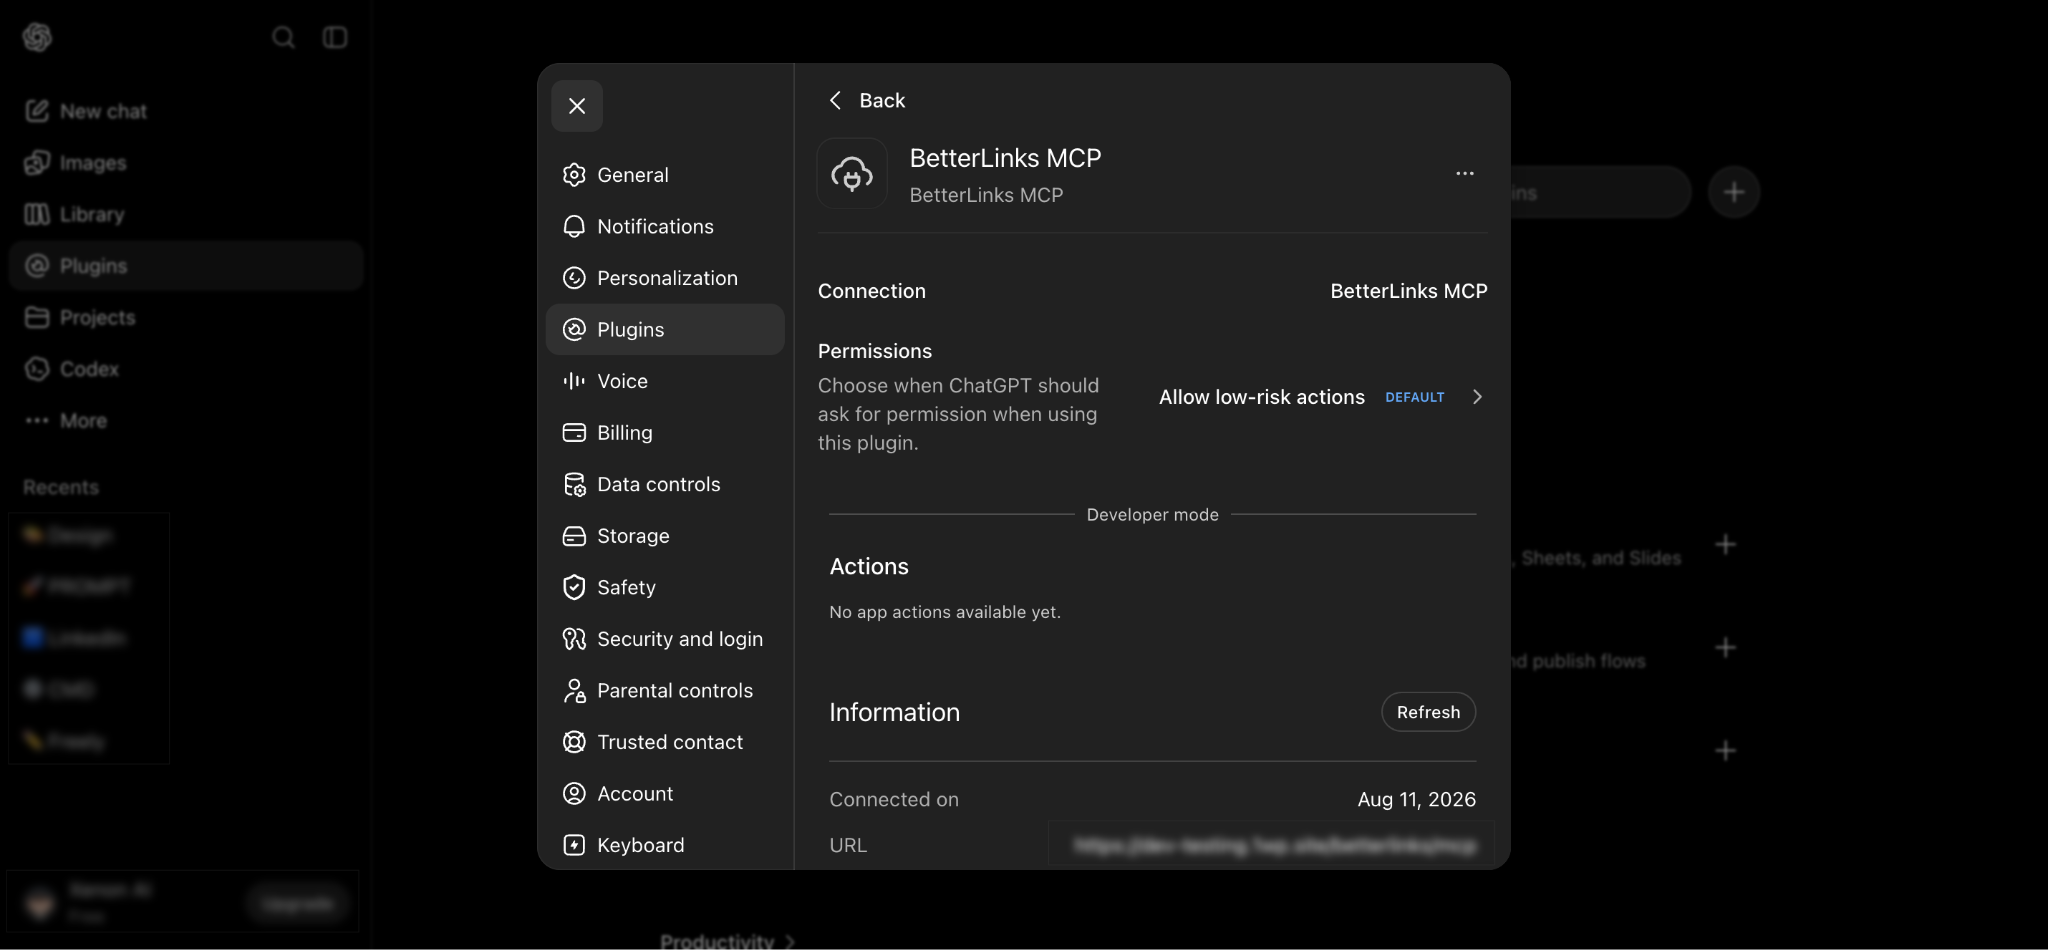
You are returned to the plugin details page, which now shows the active connection, the permission level and the date it was connected. The default permission is Allow low-risk actions, so ChatGPT will ask before running anything that changes your data. Open the permissions row if you want to make that stricter or more relaxed.
Step 8: Test the Connection in ChatGPT #
Run the same read-only test prompt you used with Claude. ChatGPT calls the tool and reports back on what it can see.
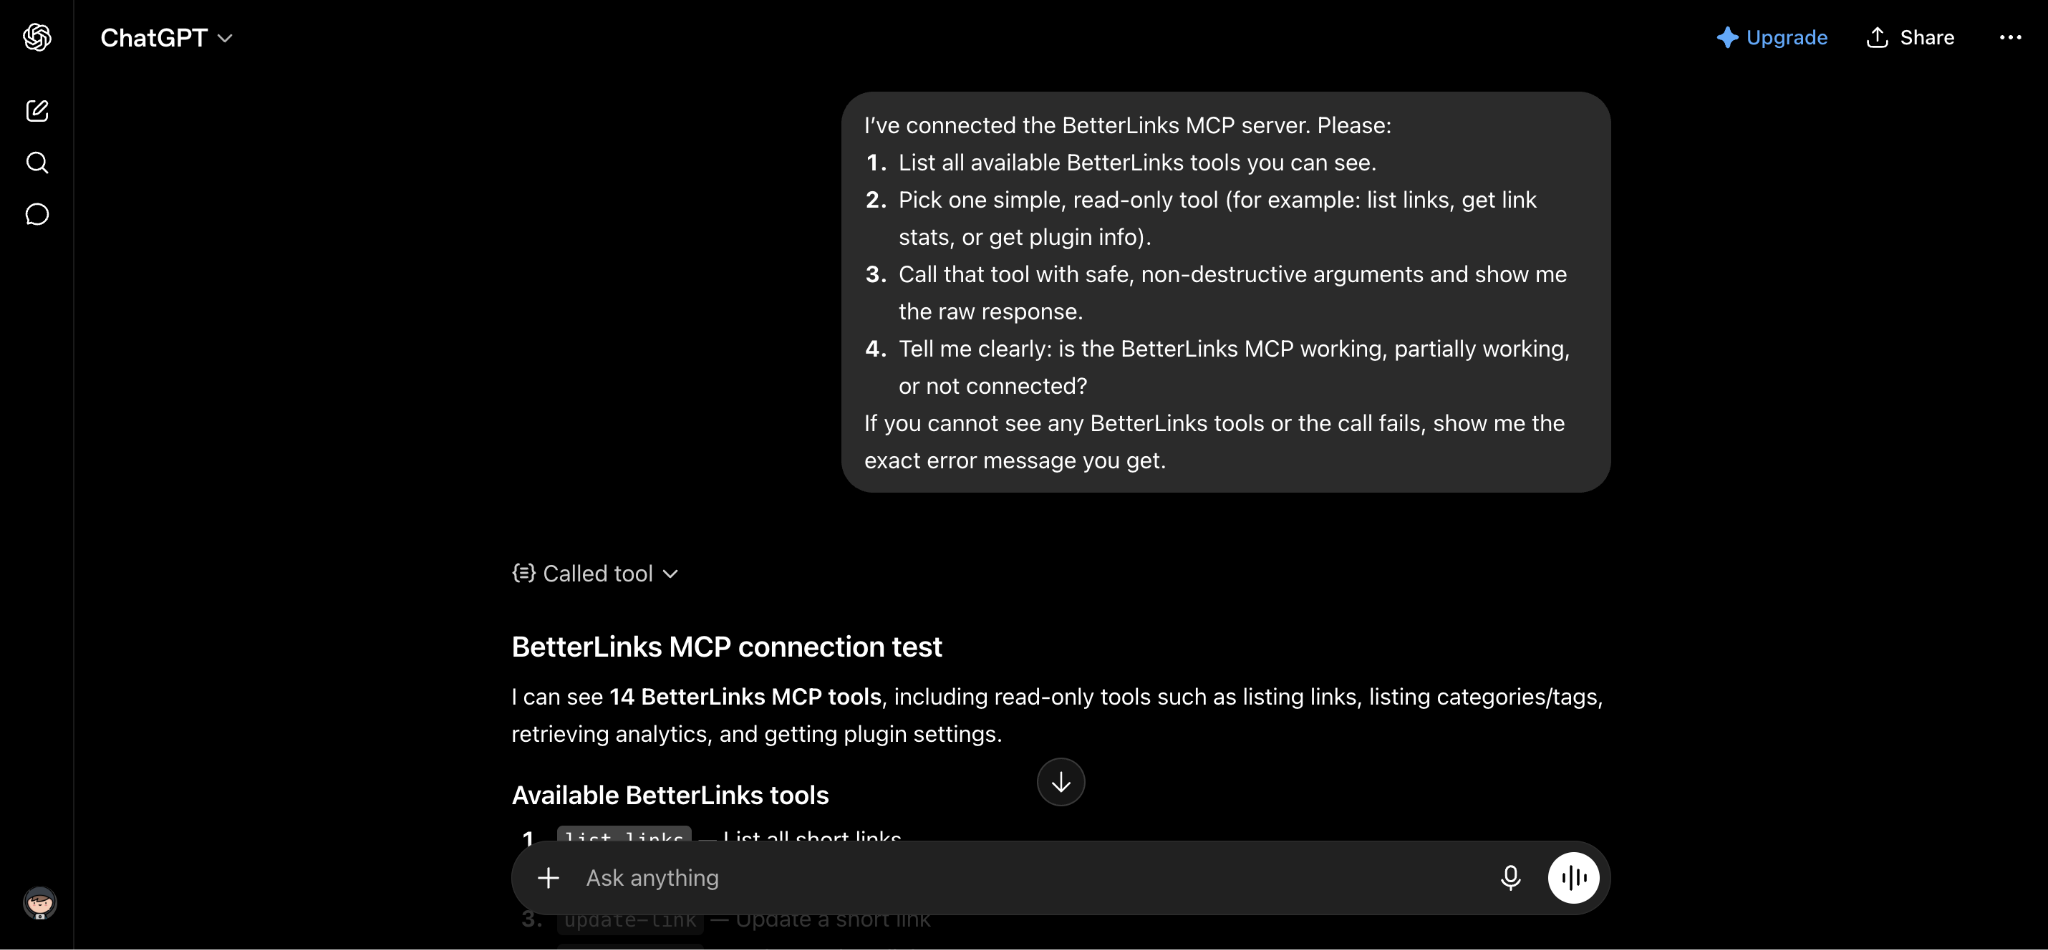
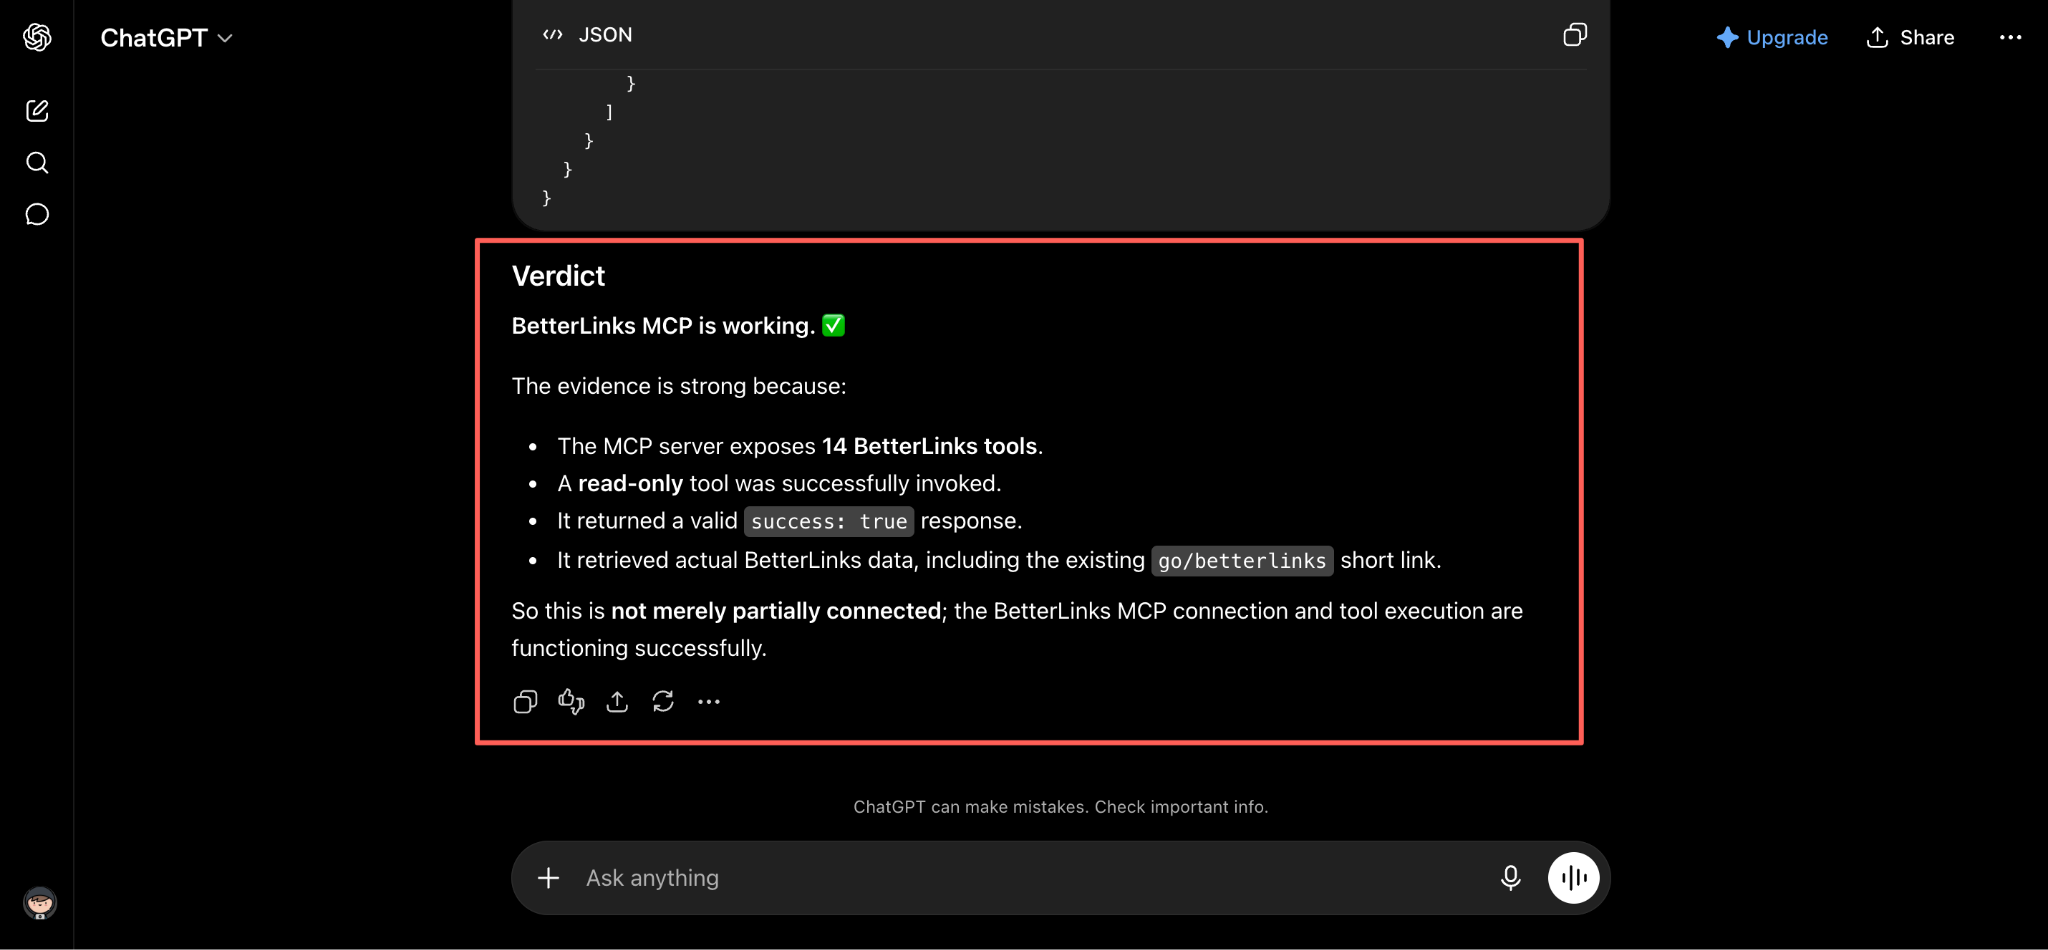
A healthy connection ends with a clear verdict: the server exposes 14 BetterLinks tools, a read-only tool was invoked successfully, the response returned success: true and real link data came back from your site. Your BetterLinks MCP setup is now ready to use.
Part 4: Disconnect an Assistant #
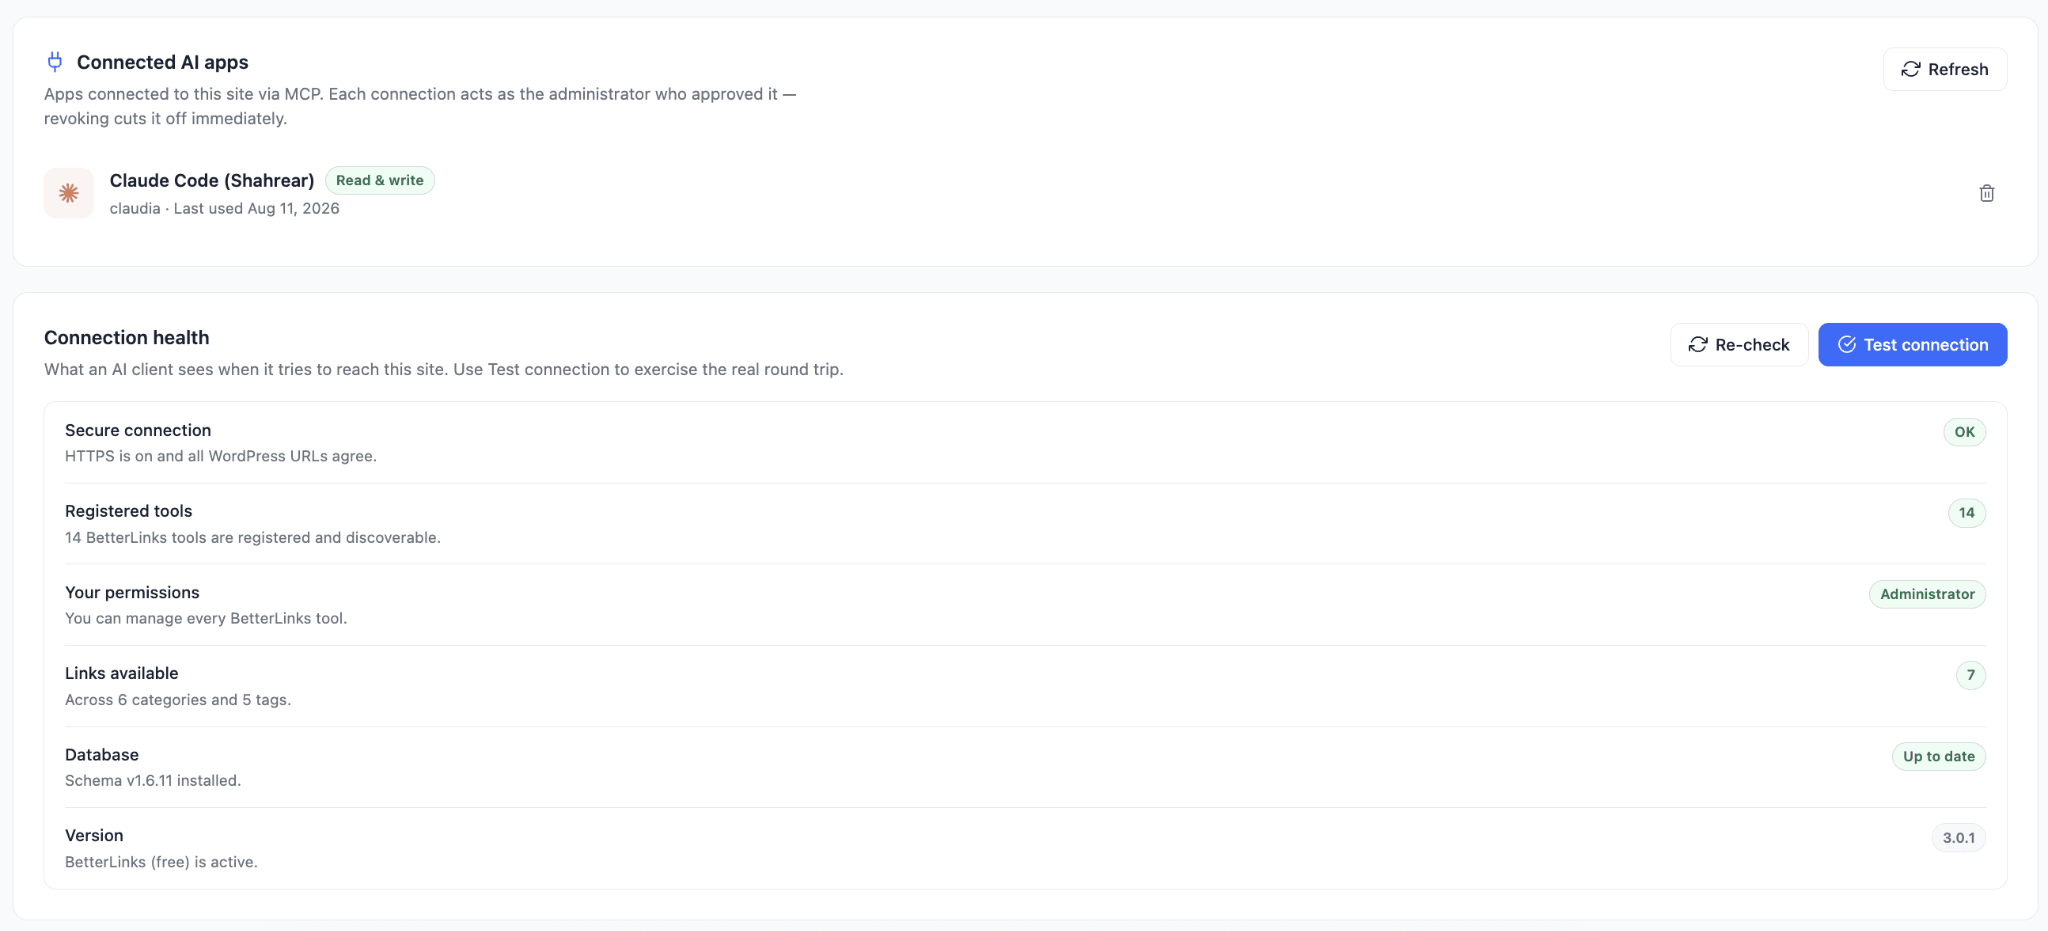
Every assistant you connect appears in BetterLinks → MCP → Connected AI apps, together with the WordPress user who approved it and the timestamp of its last request. Revocation is one click and takes effect immediately: the next tool call from that assistant returns HTTP 401. You have three levels of control, depending on how much you want to disconnect.
Revoke a single OAuth app (Claude web, desktop, mobile, ChatGPT) #
Click the trash icon on that row in the Connected AI apps list. Only that assistant is cut off; other OAuth apps and every editor or CLI connection continue to work.
Revoke every header-token client at once (Claude Code, Cursor, VS Code, Claude Desktop) #
Open the Editors & CLI tab and click Reset token. This issues a new pairing token, and the old one stops working the moment the rotation completes. OAuth apps are unaffected.
Turn the whole MCP surface off #
Flip the Enable MCP access toggle at the top of the MCP screen. Every AI client, OAuth or token-based, is refused with a clear “MCP is disabled on this site” message until you switch it back on.
Do not demote or delete the account that authorized the connection. The account listed next to each connection is the WordPress user whose capabilities the assistant is acting as. BetterLinks re-verifies the manage_options capability on every request, so if that account is demoted from administrator or deleted, every AI client connected through it stops working instantly. Approve MCP access from a stable administrator account, and reconnect any affected clients after a team change.
Troubleshooting Common Issues #
Your assistant cannot see any BetterLinks tools #
Check that the Enable MCP access toggle is still switched on, then confirm the connector URL was pasted in full and ends with /betterlinks/mcp. Disconnecting and reconnecting the connector refreshes the tool list.
If your assistant is Claude on web, mobile or desktop, or ChatGPT, also verify that your site is served over HTTPS, since these clients refuse plain-http connector URLs. If you are using the pretty /betterlinks/mcp URL, confirm your permalink structure in Settings → Permalinks is not set to “Plain”, or switch to the REST fallback URL described in the Requirements section.
The approval screen never loads #
OAuth clients require a publicly reachable HTTPS address. A local development URL will not complete the handshake, so connect from your staging or live domain instead.
Sign in with BetterLinks fails silently #
This usually means the OAuth discovery endpoints on your site are not reachable. Both /.well-known/oauth-protected-resource/betterlinks/mcp and /.well-known/oauth-authorization-server must return HTTP 200. On some nginx subdirectory installs the .well-known path is blocked upstream and needs to be passed through explicitly. Check both URLs in a browser, and if either returns 404 ask your host or system administrator to allow .well-known through to WordPress.
You are getting HTTP 429 errors #
The MCP endpoint rate-limits repeated bad-token requests. If you pasted a wrong token by mistake and retried quickly, further requests from the same IP are temporarily blocked to protect your site. Wait about a minute and then use the correct token, and the block clears on its own.
A tool call returns a permission error #
The connection inherits the capabilities of the administrator account that approved it. If that account loses the relevant capability, the tool call will fail. Approving again with a full administrator account resolves it.
The connection just stopped working #
Work through these three checks in order:
- Open BetterLinks → MCP and confirm the Enable MCP access toggle is still on. If an administrator disabled it, every client is refused.
- Look at the Connected AI apps list. If the row for this assistant is gone, someone revoked it and you need to reconnect.
- Check the WordPress user account that originally approved the connection. MCP re-verifies that account’s administrator capability on every request, so if it has been demoted or deleted, every client connected through it stops working. Reconnect from a stable administrator account to resolve it.
That is how easily you can use MCP in BetterLinks and let Claude, ChatGPT or your favorite editor create and manage short links directly on your WordPress site. Enable the toggle once, copy your connector URL, approve the connection and your assistant is ready to work alongside you.
Getting stuck or facing issues? Feel free to contact our support team for further assistance, or browse the full BetterLinks documentation to explore more features.