BetterLinks has introduced Custom Domain feature that is designed to streamline your link management process. This feature simplifies the redirection process from your main domain to your custom domain. Also, it enhances the management and link organization efficiently. In this documentation, we will explore how the Custom Domain feature works, and step-by-step instructions to help you get the most out of this feature.
How To Configure Custom Domain On BetterLinks #
Before you start using the custom domain feature, you need to Insert the custom domain, including HTTP protocol, at the beginning of your domain and make sure it doesn’t end with a slash.
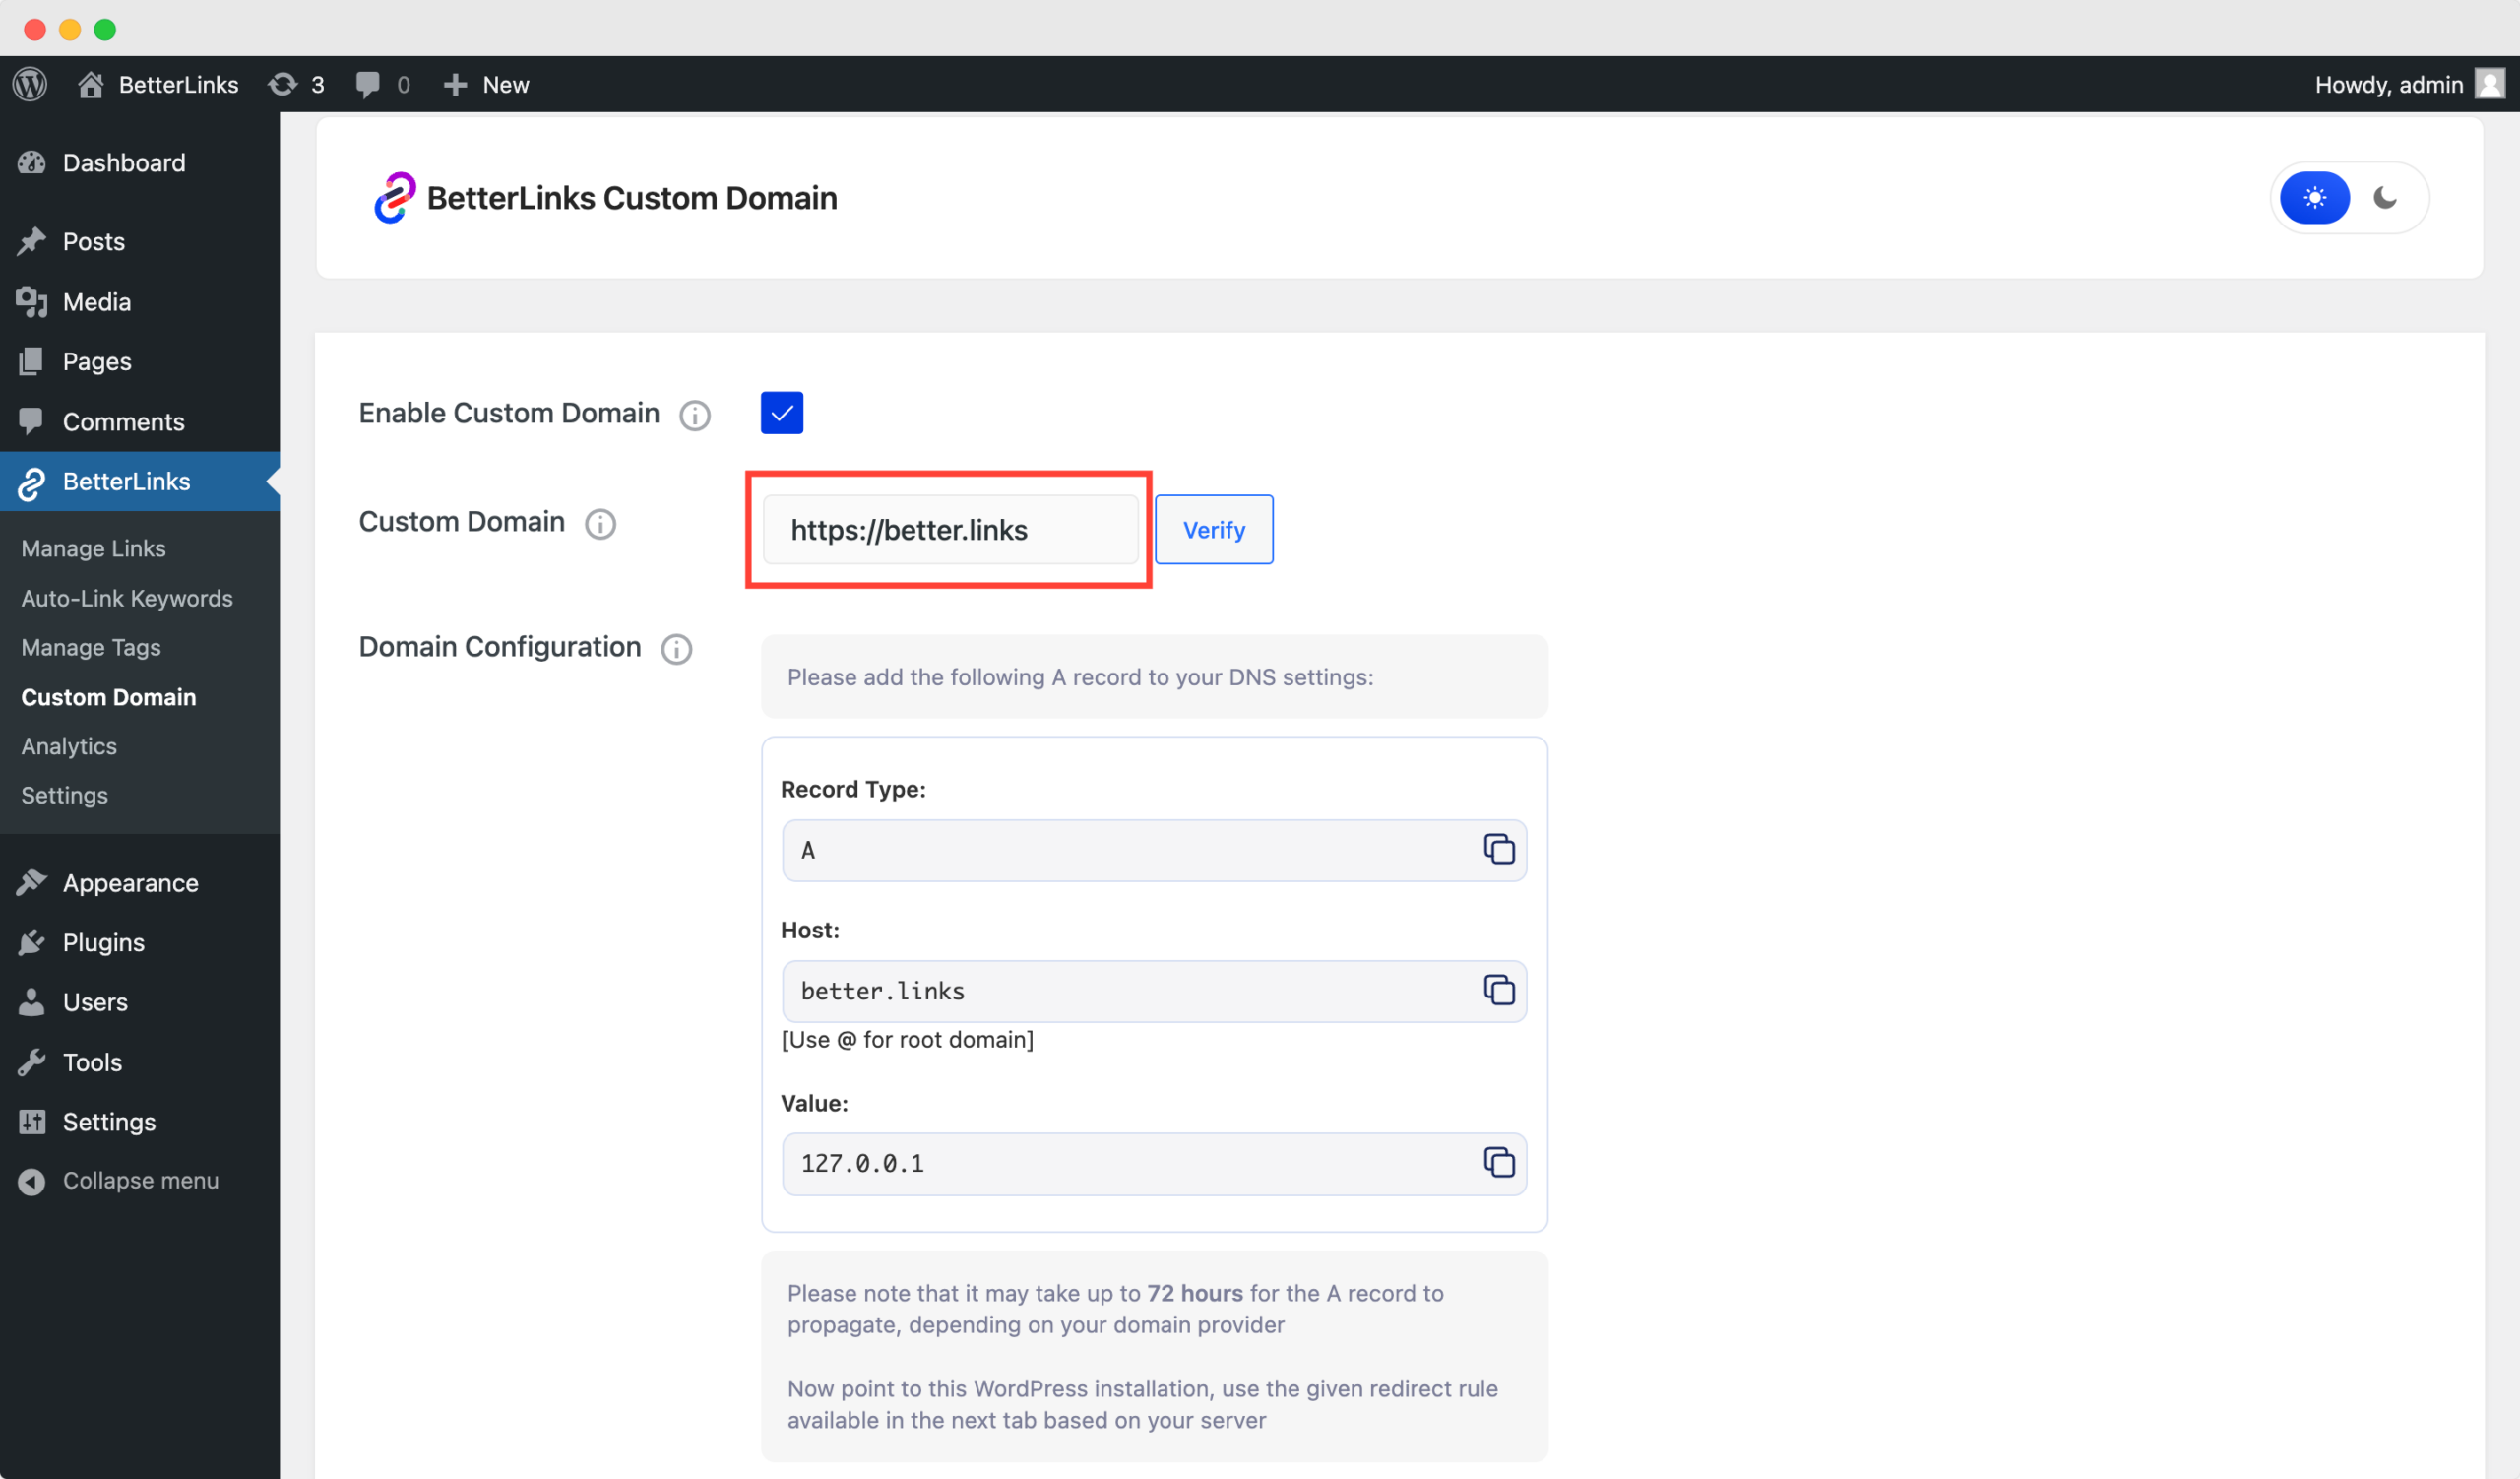
Step 1: Point Your Domain #
After getting the ‘A’ record from the ‘Domain Configuration’ section then add the ‘A’ record to your Domain’s DNS settings.
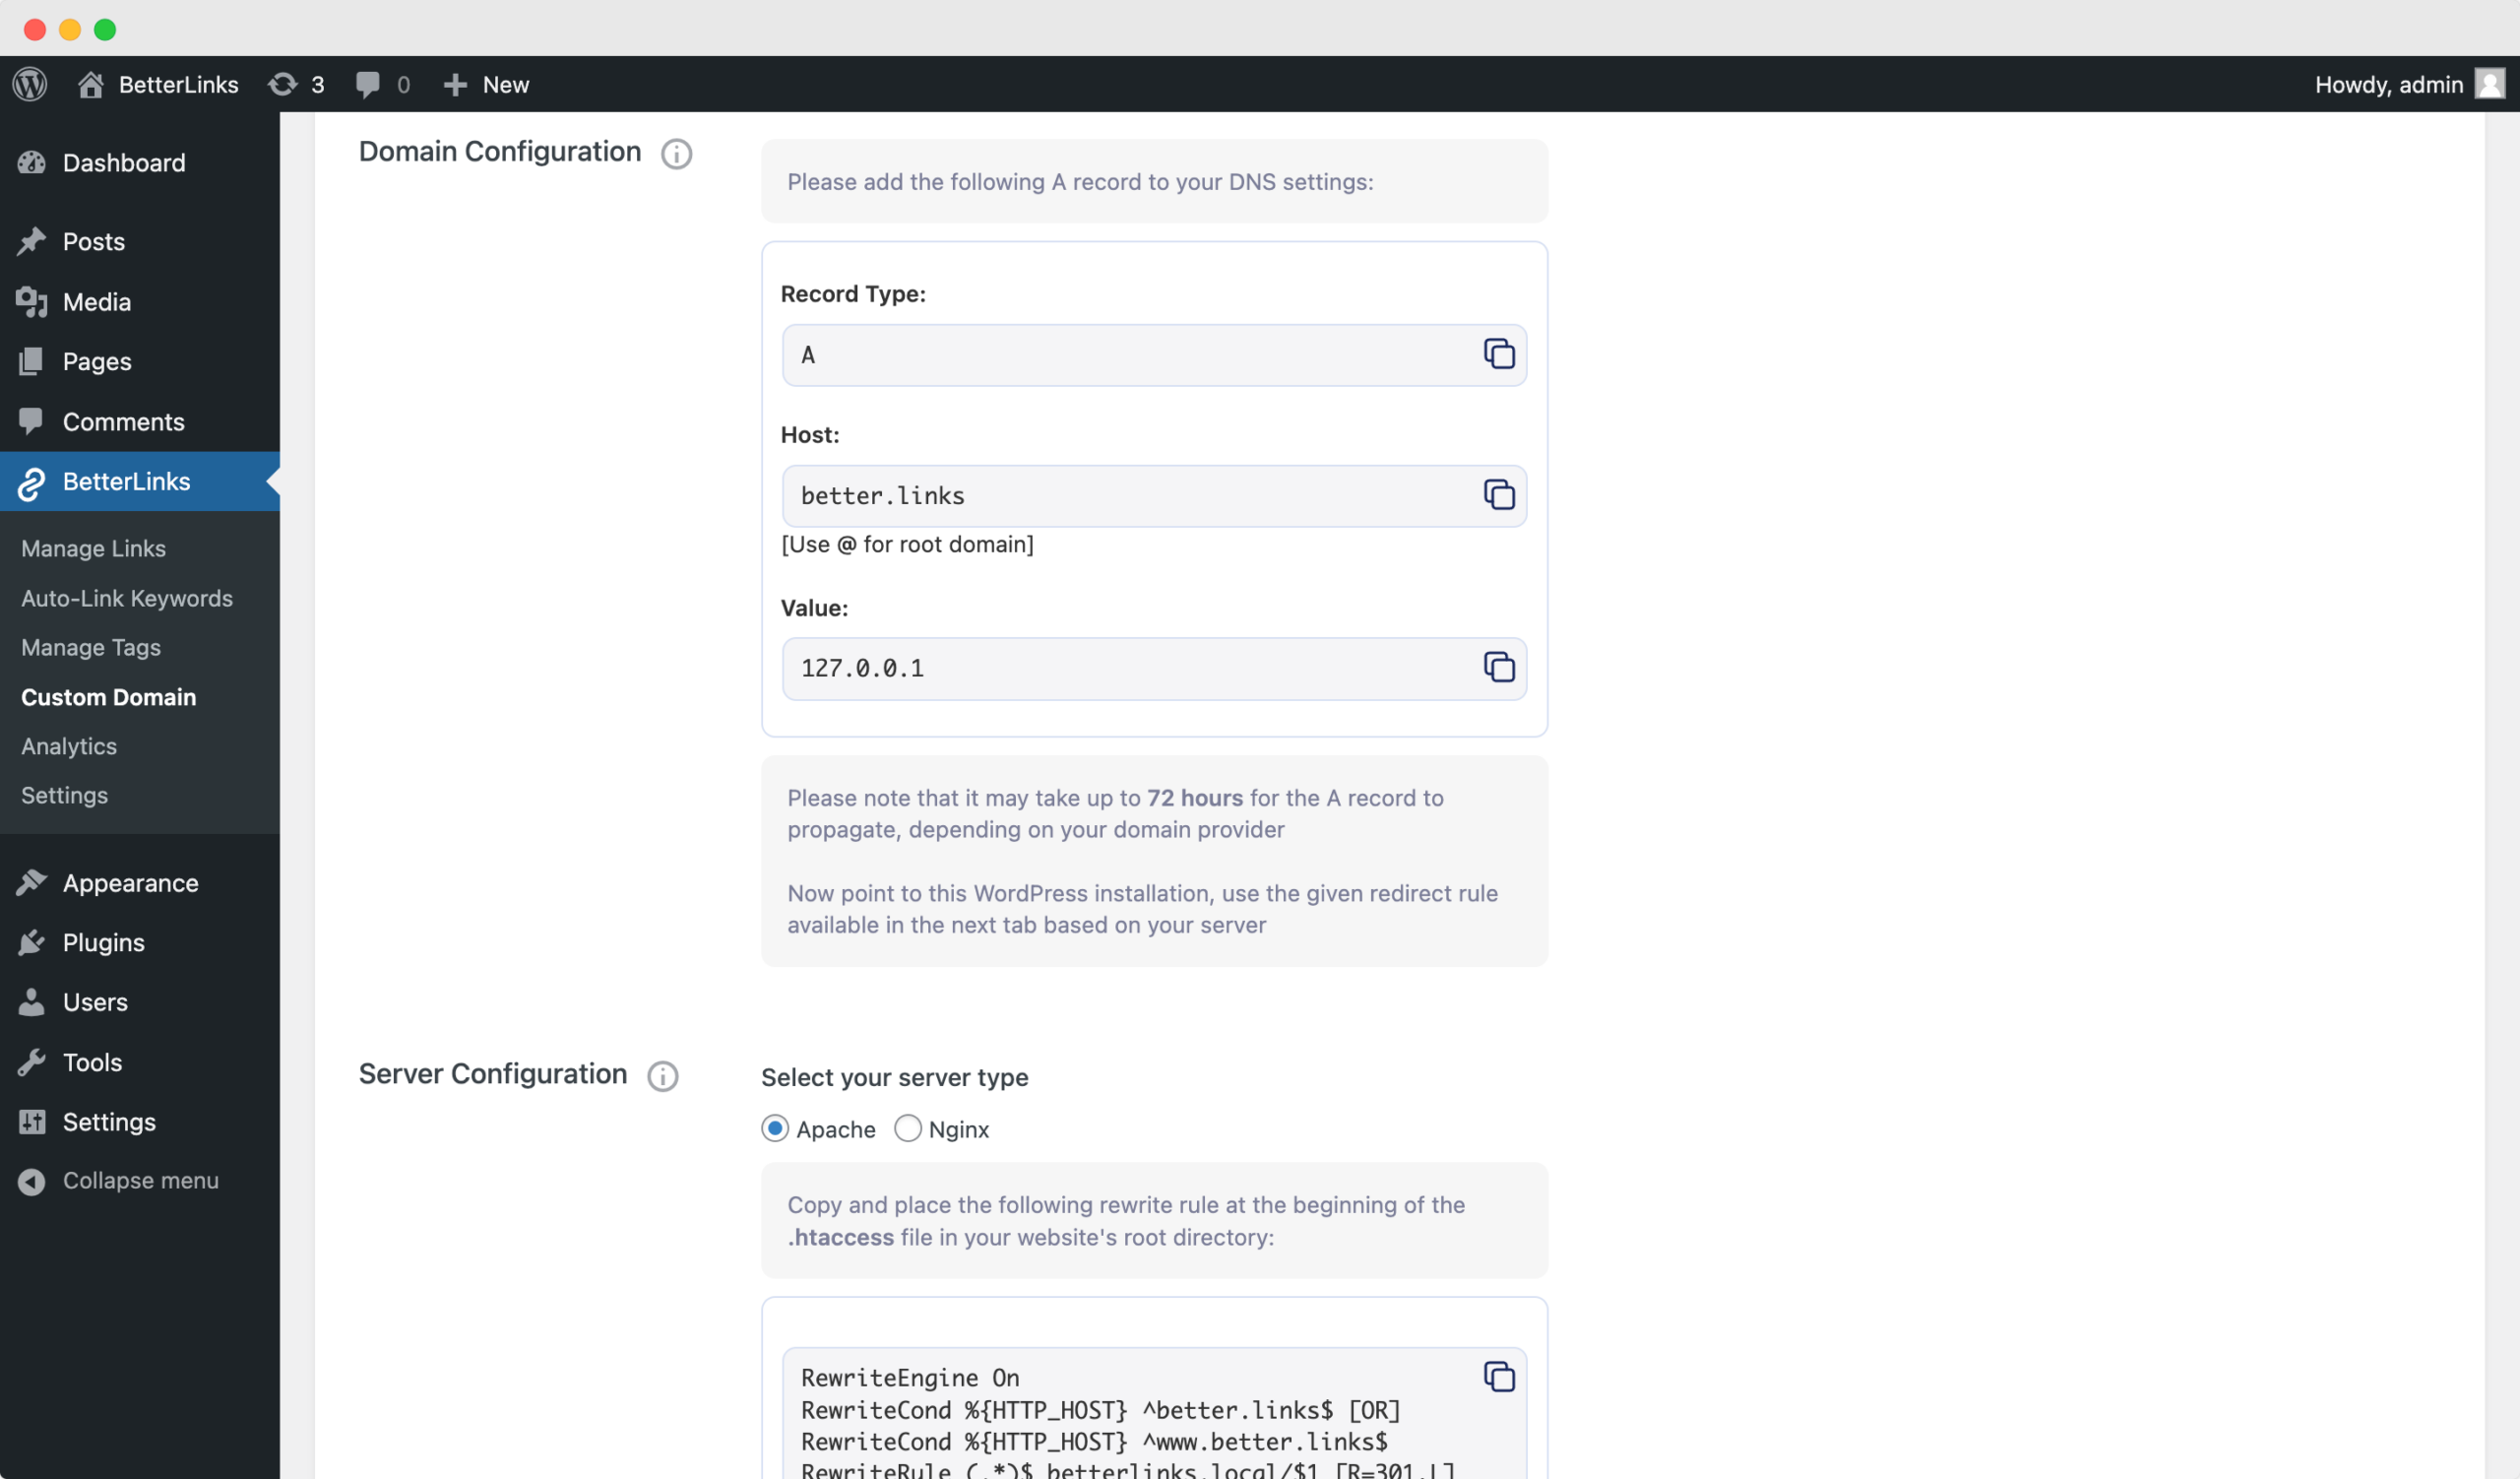
Depending on your domain provider, it might take up to 72 hours. To check your domain’s current A records status, you can use any online DNS checker.
Step 2: Find The Server Type #
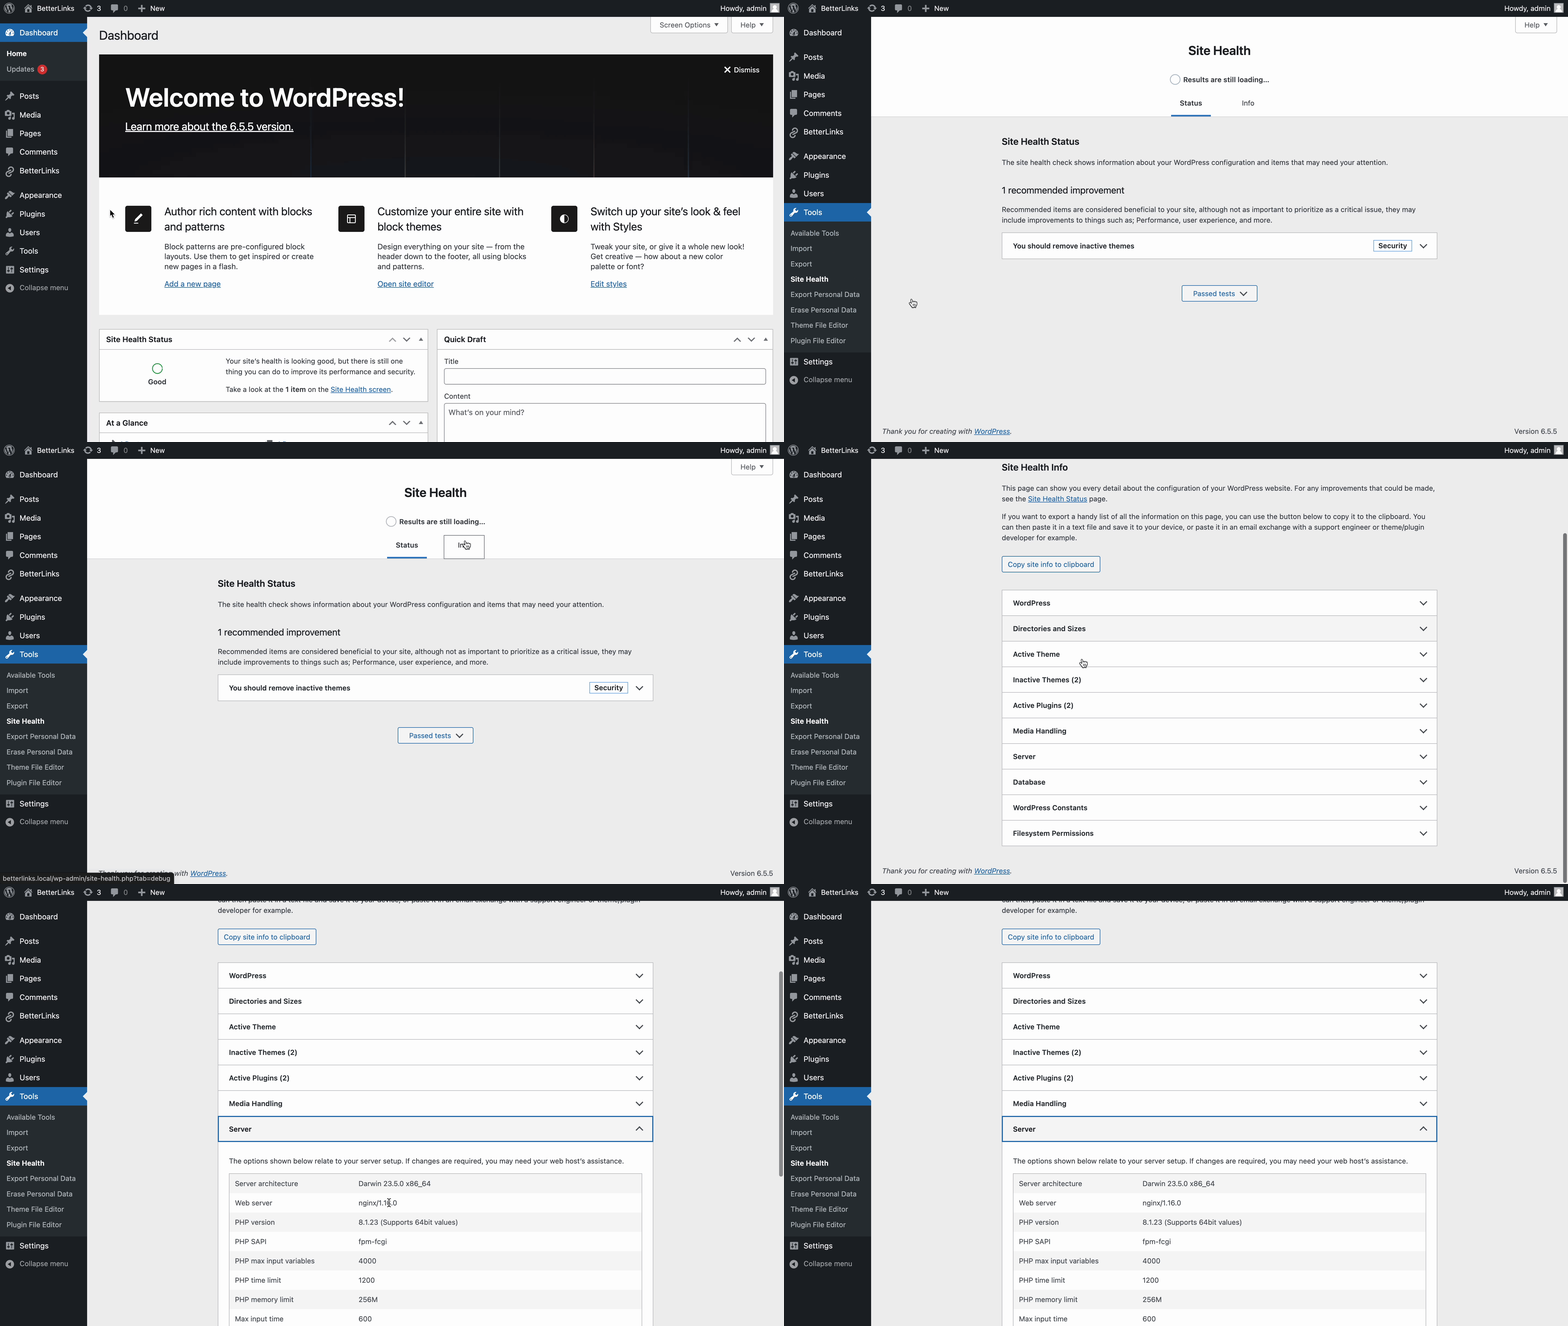
Once you finish the domain configuration, find the server type and environment. Go to ‘Tools’ and then click ‘Site Health’ to confirm whether it is Nginx or Apache.
Step 3: Server Configuration #
After getting the server type, make sure to add your custom domain to the server. For example, If you are using cPanel as your site management platform, make sure to add your custom domain to your cPanel domain list as well.

Apache #
If your server is Apache and using cPanel, select Apache & copy the rewrite rule from the plugin dashboard as shown below for later use.
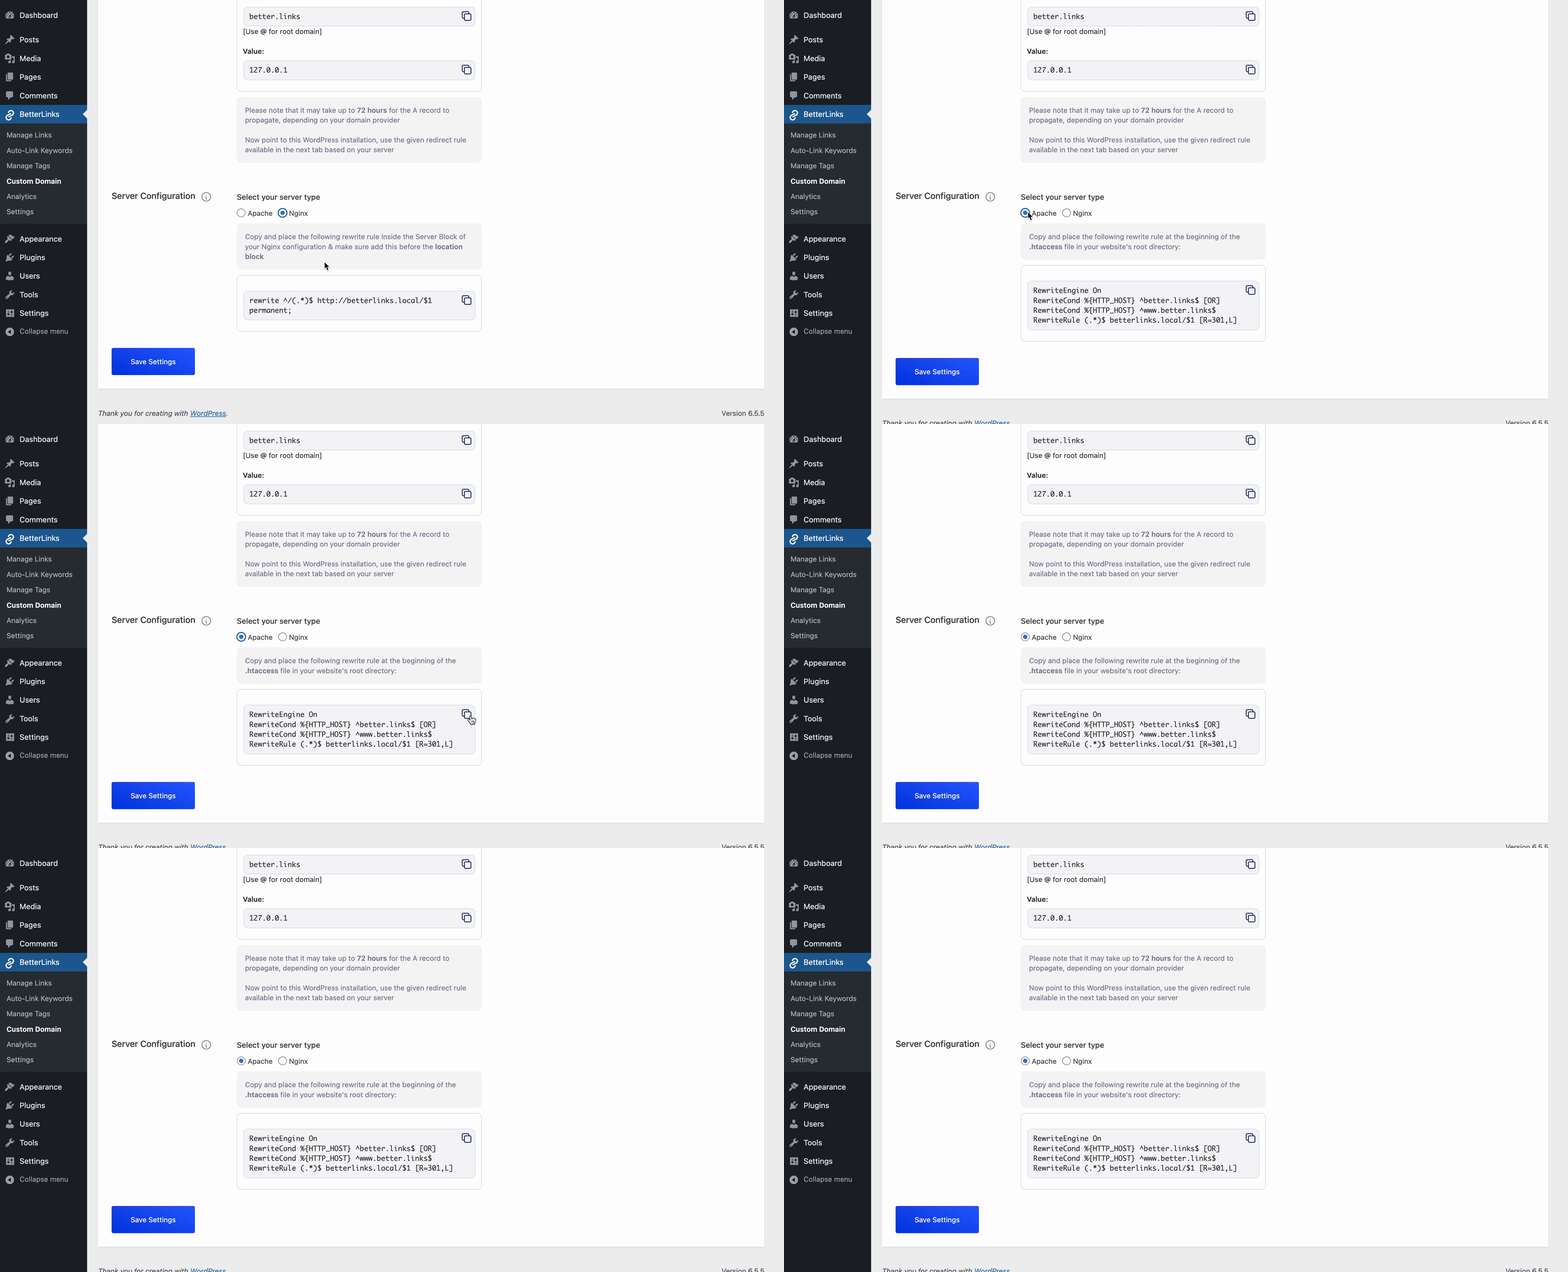
Once you are with coping the rewrite rule, follow the steps as it is shown below.
- In the cPanel dashboard, locate and click on “File Manager” under the “Files” section.
- Navigate to the root directory of your website. If you’re working with an addon domain or subdomain, navigate to the corresponding folder.
- Look for .htaccess in the file list. If it’s not there, you may need to create it.
- Right-click on .htaccess and select “Edit” from the menu. Choose the text editor option.
- Paste the copied rules at the beginning of the .htaccess file.
- After editing, save the changes and close the editor. Your .htaccess file is now updated.

Nginx #
If your server is Nginx, then in this directory ‘/etc/nginx/sites-available/your-site-url.com/.conf. Copy and place the given code from the Plugin inside the Server Block of your Nginx configuration & make sure to add this before the location block.
- Open your Nginx configuration file from here: /etc/nginx/sites-available/your-site-url.com/.conf
- Copy the code from the Server Configuration
- Paste it inside the Server Block of your Nginx configuration & make sure to add this before the location block.
You can do it easily on other server management platforms like xCloud. To do so, let’s follow the steps onward:
Apache #
If your server is Apache and using xCloud, select Apache & copy the rewrite rule from the plugin dashboard as shown below for later use.
Once you are with coping the rewrite rule, follow the steps as it is shown below.
- In the xCloud dashboard, select, ‘access data’ on your preferred domain, and click on “File Manager” then click “Launch File Manager”.
- Navigate to the root directory of your website. Navigate to the corresponding folder if you’re working with an addon domain.
- First, enable the hidden file & then look for it & if it’s not there then create the .htaccess file.
- Right-click on .htaccess and select “Edit” from the menu. Choose the text editor option.
- Paste the copied rules at the beginning of the .htaccess file.
- After editing, save the changes and close the editor. Your .htaccess file is now updated.
Nginx #
If your server is Nginx, on xCloud, then copy and place the given code from the Plugin inside the Server Block of your Nginx configuration & make sure to add this before the location block.
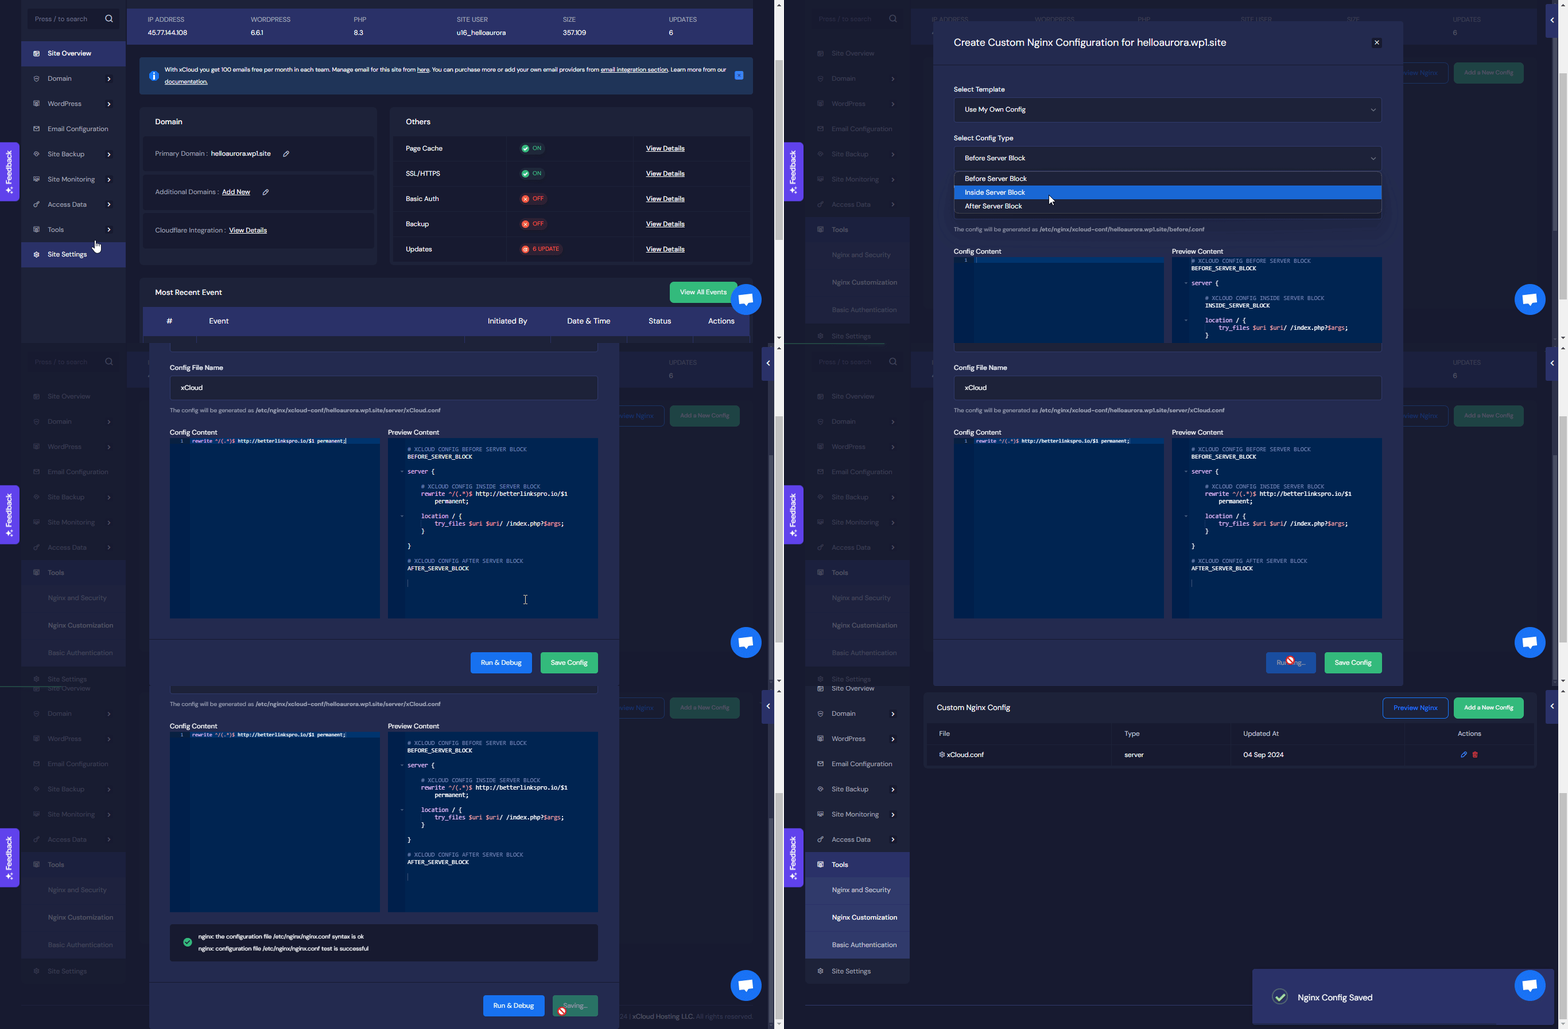
- Open your Nginx configuration file from here:
- Then go to tools and select ‘Nginx customization’
- Now click on, ‘Add a New Config’
- From the ‘Select Config Type’ choose the block
- Copy the code from the Server Configuration
- Paste it inside the Server Block of your Nginx configuration & make sure to add this before the location block.
- Click on the ‘Save config’ button.
Step 4: Verify Your Custom Domain #
Now, return to your dashboard and click on the ‘Verify’ button. Once it gets verified, click on the ‘Save Settings’ button.
Step 5: Overview The Functionality #
You can now effortlessly create shortened URLs using your new custom domain. All your existing links will be available under this new domain, and your old ones will continue working seamlessly.
Are you stuck or have any queries? Feel free to contact our support team for further assistance.


